
Crochet Bag: Lavender Butterfly Purse Guide
A crochet bag can be much more than a practical accessory. With creative shaping, carefully selected colors, and decorative details, crochet can transform a simple purse into a statement piece.
The Lavender Butterfly Purse is an intermediate crochet project inspired by the delicate shape and colors of butterfly wings. The design combines shaped crochet panels, lavender color transitions, decorative edging, surface details, and a dimensional butterfly body.
The finished purse measures approximately 13 inches wide by 9 inches tall, excluding the strap and antennae. This guide explains the main materials, techniques, construction, and finishing process without reproducing the original pattern row by row.
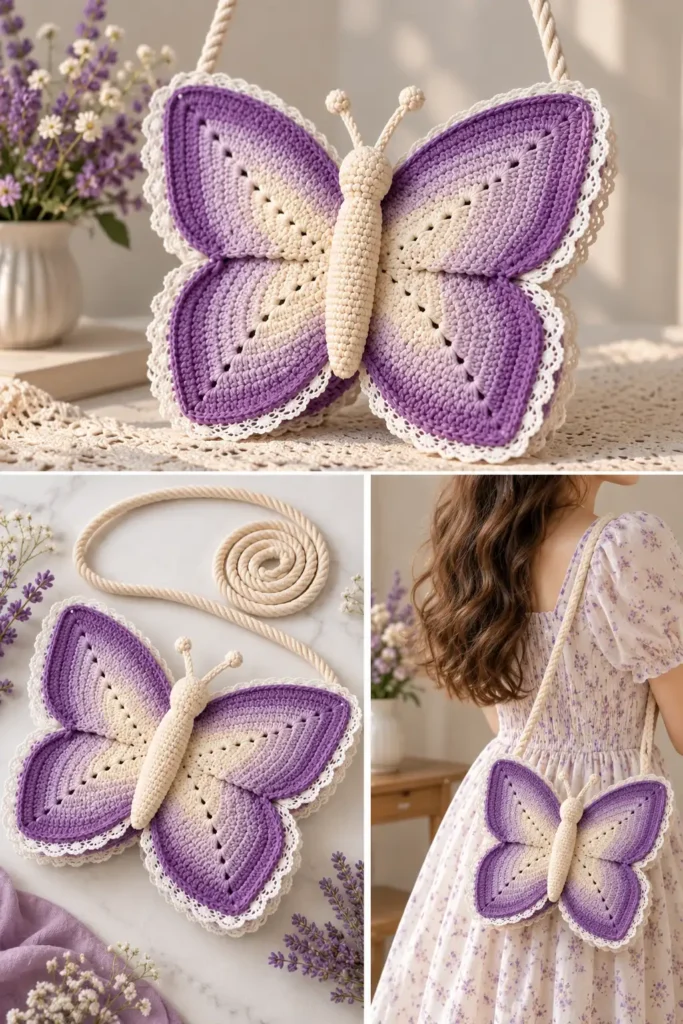
Table of Contents
About This Butterfly Crochet Bag
This crochet bag stands out because it replaces the traditional rectangular purse shape with a butterfly silhouette.
The design combines larger upper wings with smaller lower wings. Different shades of cream and purple create a soft gradient, while scalloped crochet edging and white cotton lace highlight the outline.
A dimensional crocheted butterfly body runs through the center of the finished purse, helping complete the butterfly appearance.
The purse also features a top opening, magnetic snap closure, and crossbody strap, making the decorative design functional for everyday use.
Skill Level
The Lavender Butterfly Purse is classified as an intermediate crochet project.
It is best suited to crocheters who are already comfortable with basic stitches and are ready to work with:
- Shaped crochet panels
- Increases and decreases
- Color changes
- Mirrored pieces
- Surface crochet
- Decorative edging
- Basic amigurumi
- Seaming and assembly
The pattern uses US crochet terminology.
Materials You’ll Need
The project uses worsted-weight cotton yarn in four colors:
- Cream or off-white
- Soft lavender
- Medium purple
- Deep purple
The original project specifies approximately 120 yards (110 m) of cream, 100 yards (91 m) each of soft lavender and medium purple, and 80 yards (73 m) of deep purple.
A US G-6 (4.0 mm) crochet hook is used for the project.
Additional supplies include white cotton crochet lace trim, polyester fiberfill, stitch markers, scissors, a yarn needle, a sewing needle with white thread, a magnetic snap closure, and removable locking stitch markers or safety pins for assembly.
Choosing Yarn for Your Crochet Bag
Cotton is particularly useful for this project because the butterfly wings need enough structure to maintain their shape.
The original design recommends 100% cotton or a cotton-blend yarn. Cotton generally provides good stitch definition and helps shaped crochet pieces remain structured.
When choosing an alternative yarn, consider more than color. Fiber composition, yarn weight, elasticity, and texture can all influence the appearance and dimensions of the finished bag.
A gauge swatch is especially useful before committing to all the individual wing panels.
Gauge
Gauge matters because several separately crocheted pieces eventually need to align during assembly.
The specified gauge is:
18 single crochet stitches and 20 rows = 4 inches (10 cm) when worked flat in single crochet with a 4.0 mm hook after blocking.
If your swatch is larger than the specified gauge, you may need to adjust your hook size. If it is smaller, a larger hook may be appropriate.
Always check gauge before beginning the main pieces.
Crochet Stitches and Abbreviations
The project uses US crochet terminology.
Important abbreviations include:
- ch – chain
- sl st – slip stitch
- sc – single crochet
- hdc – half double crochet
- dc – double crochet
- inc – increase
- dec – decrease
- sk – skip
- st(s) – stitch(es)
- RS – right side
- WS – wrong side
- BLO – back loop only
- FLO – front loop only
- YO – yarn over
- MR – magic ring
Decorative techniques include shell or scallop work and surface slip stitches used to create raised butterfly-wing details.
Understanding the Butterfly Construction
Unlike a standard crochet bag made from rectangular panels, this project is constructed from several shaped pieces.
Upper wings create the larger sections of the butterfly, while smaller lower wings complete the silhouette.
The project uses separate upper- and lower-wing panels for the front and back of the purse. Mirrored shaping creates corresponding left and right sides.
After the individual pieces are completed and blocked, they are assembled into front and back butterfly sections. These layers are then joined while leaving the necessary opening at the top.
Creating the Lavender Gradient
Color plays an important role in the butterfly effect.
The palette progresses through:
Cream → Soft Lavender → Medium Purple → Deep Purple
Organizing your yarn in this order before beginning can make the color sequence easier to follow.
Try to maintain consistent tension during each color change. Uneven tension can affect the shape of the wings and make transitions appear less smooth.
Cleanly woven yarn ends will also help keep the finished bag looking polished.
Making the Upper Wings
The upper wings form the largest areas of the butterfly.
Their shaping gradually expands before tapering toward the center. Mirrored pieces are used so the left and right wings face one another correctly.
Each completed upper wing panel is approximately 7 inches wide at its widest point and 8 inches tall.
Because these pieces establish much of the final butterfly silhouette, consistent shaping is important.
Compare matching pieces before assembly to make sure their overall proportions remain similar.
Making the Lower Wings
The lower wings are smaller and more rounded.
Their shaping creates the lower lobes of the butterfly silhouette, and corresponding mirrored pieces maintain symmetry on both sides.
Each completed lower wing panel measures approximately 6 inches wide by 6 inches tall.
Blocking these pieces individually can help refine their curves and prepare them for assembly.
Assembling the Wings
Once the upper and lower wing sections are finished, the corresponding pieces are positioned together to form the butterfly shape.
The front and back layers are then aligned and joined around their outer edges while the required opening remains accessible.
Before permanently seaming everything, temporarily secure the pieces with removable stitch markers or safety pins.
This allows you to check:
- Wing alignment
- Overall symmetry
- Center positioning
- Top opening
- Final silhouette
The assembled purse is designed to measure approximately 13 inches wide by 9 inches tall.
Adding the Decorative Border
One of the most distinctive elements of this crochet bag is its decorative edge.
A scalloped crochet border follows the butterfly silhouette and emphasizes the curves of the wings.
White cotton crochet lace is positioned near the border to add another layer of texture and create a delicate vintage-inspired appearance.
Pay particular attention around curves and pointed sections. Consistent spacing helps the edging follow the wing shape naturally.
Creating Butterfly Wing Veins
Surface crochet adds dimension without changing the underlying structure of the wing panels.
The project uses surface slip stitches to create raised lines resembling natural butterfly-wing veins.
Longer lines extend from the central area, while shorter branches add additional definition.
Avoid pulling the surface stitches too tightly. Excessive tension can cause the finished wing to curl or distort.
Making the Butterfly Body
The center of the purse includes a three-dimensional crocheted butterfly body.
Unlike the flat wing panels, this section uses basic amigurumi techniques.
It is worked in continuous rounds beginning with a magic ring and is lightly stuffed with polyester fiberfill.
The finished butterfly body measures approximately 4 inches long by 1 inch wide.
Crocheted antennae complete the butterfly appearance before the body is attached vertically through the center of the purse.
Adding the Magnetic Closure
A magnetic snap helps keep the purse closed.
The closure is positioned inside the central opening. Reinforcement around the snap can help protect the crocheted fabric from repeated pulling.
It is easier to install this hardware before all the decorative center components are permanently secured.
Check that both sides of the snap align correctly before completing the final assembly.
Creating the Crossbody Strap
The original project uses a long cream strap made from multiple yarn strands that are grouped and braided or twisted firmly.
The finished strap is approximately 48 inches long.
A twisted cotton rope of a similar length can also be used as an alternative.
Whatever method you choose, make sure the attachment points are secure enough to support the purse and its contents.
Blocking the Crochet Bag
Blocking is particularly helpful for shaped crochet pieces.
The individual wing panels can be wet blocked before assembly, carefully shaped, and left to dry completely.
Blocking can help improve:
- Wing symmetry
- Stitch definition
- Curved edges
- Panel alignment
- Overall shape
After assembly, light reshaping can help refine the final butterfly silhouette.
Always follow the care instructions for the specific yarn you use.
Caring for Your Finished Crochet Bag
Hand washing is the safest approach for this project.
Use cool water and a gentle detergent. Avoid twisting or wringing the bag because this could distort the butterfly shape.
After washing, gently reshape the purse and allow it to dry flat.
Machine washing and tumble drying are not recommended for this design.
Careful storage will also help prevent the wings and strap from becoming stretched or misshapen.
Tips for a Beautiful Finished Result
Take your time with the shaped pieces. A project made from several mirrored components benefits from frequent comparison during construction.
Check your gauge before starting, keep your color changes neat, and block individual panels before assembly.
Use temporary markers to position the wings before sewing them permanently. This gives you an opportunity to correct alignment and symmetry.
Finally, secure and weave in yarn ends carefully so they remain hidden inside the finished bag.
Conclusion
A butterfly crochet bag combines practical construction with decorative crochet techniques in a distinctive handmade accessory.
The Lavender Butterfly Purse brings together cotton yarn, graduated purple shades, shaped wings, scalloped edging, lace trim, surface crochet, basic amigurumi, and a functional crossbody design.
For crocheters comfortable with the fundamentals, the project provides an opportunity to practice shaping, color changes, mirrored construction, assembly, and decorative finishing while creating something very different from a conventional crochet purse.
requently Asked Questions
Is this butterfly Bag suitable for beginners?
The reference pattern classifies the project as intermediate. It is better suited to crocheters who are already comfortable with basic crochet stitches and are ready to work with shaping, color changes, mirrored pieces, surface crochet, assembly, and basic amigurumi techniques.
Why is cotton yarn recommended for this Bag?
Cotton or a cotton-blend yarn provides useful structure and stitch definition. These qualities are particularly helpful for shaped butterfly wings because the finished pieces need to retain their form after assembly and regular use.
Should I block the butterfly pieces before assembling the Bag?
Yes. Blocking the individual wing panels before assembly can help refine their shapes and make corresponding pieces easier to align. Allow each piece to dry completely before joining the sections.
How should I care for the finished crochet Bag?
Hand wash it gently in cool water using a mild detergent. Avoid wringing or twisting the purse. Reshape it carefully and allow it to dry flat so the butterfly wings and decorative details maintain their form.
Leave a Reply