
Crochet Onion and Garlic Hanging Bags: Easy Free Pattern
Looking for a pretty way to keep garlic and onions organized without crowding your kitchen counter? These crochet onion and garlic hanging bags turn everyday produce storage into a charming farmhouse detail. The open diamond mesh gives each bag an airy feel, while the long hanging loop keeps produce off your worktop.
Pattern note: This is an original, beginner-friendly interpretation inspired by the pictured bags, not an exact transcription of the video maker’s pattern. The pattern below is designed for small to medium garlic or onion bags; you can add or remove mesh rounds to change their size.
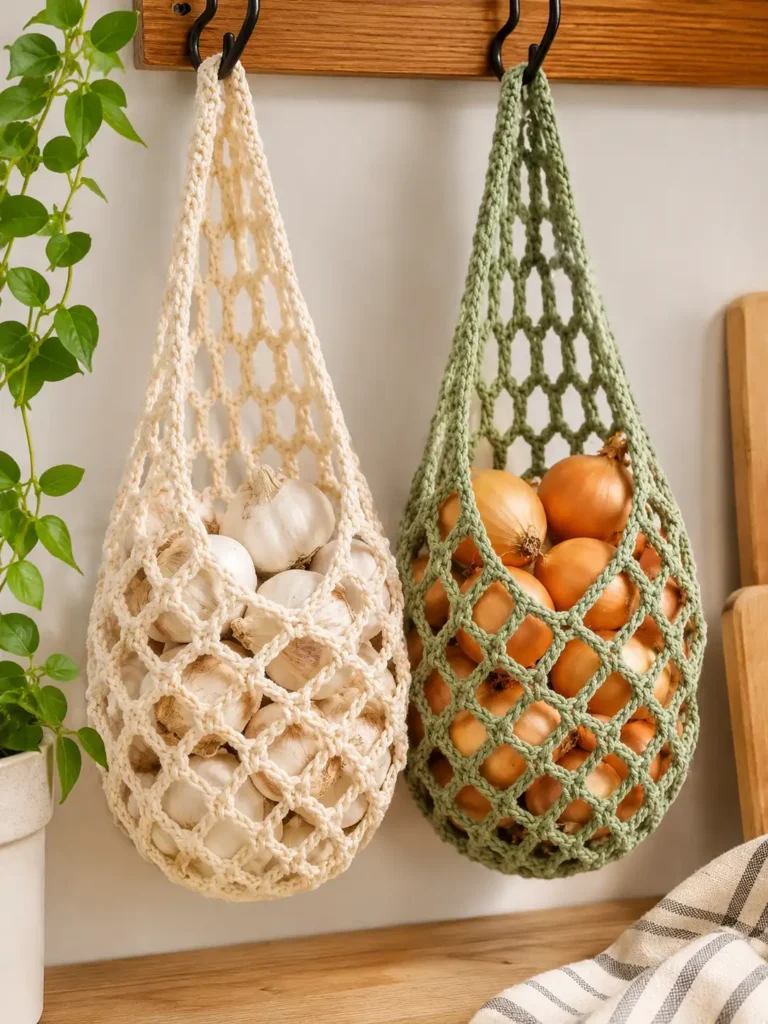
Table of Contents
Why You’ll Love These Crochet Produce Bags
- A practical hanging organizer that frees up counter space
- A light, stretchy diamond-mesh design that works up quickly
- Two looks from the same pattern: natural cream for garlic, sage green for onions
- A handmade gift idea for farmhouse and cottage-style kitchens
Materials You’ll Need
- Approximately 100–150 yards of sturdy worsted-weight cotton yarn per bag, depending on size and tension
- 4.0 mm (G/6) crochet hook, or a hook that makes a firm base
- Stitch marker
- Yarn needle and scissors
- Optional: a metal or wooden wall hook rated for the filled bag’s weight
Yarn tip: Cotton is a good choice because it has structure and can be washed. Avoid fuzzy or delicate yarns that may snag on papery onion or garlic skins.
Crochet Abbreviations (US Terms)
- ch = chain
- sl st = slip stitch
- sc = single crochet
- dc = double crochet
- st(s) = stitch(es)
- sp = space
- rep = repeat
Finished Size and Gauge
The sample-style bag is approximately 12–15 in (30–38 cm) tall, including its hanging handle, with a flexible pouch about 6–8 in (15–20 cm) wide when filled. Size is approximate: mesh stretches, and your yarn, hook and tension will change the result. Exact gauge is not essential, but keep the base tight enough that small garlic bulbs cannot slip through.
Free Crochet Onion and Garlic Hanging Bag Pattern
Step 1: Make a sturdy round base
Make a magic ring. Round 1: Ch 1, work 8 sc into the ring; join with a sl st to the first sc (8 sts). Round 2: Ch 1, work 2 sc in each st around; join (16 sts). Round 3: Ch 1, *sc in next st, 2 sc in next st* around; join (24 sts). Round 4: Ch 1, *sc in each of next 2 sts, 2 sc in next st* around; join (32 sts). Round 5: Ch 1, *sc in each of next 3 sts, 2 sc in next st* around; join (40 sts).
For a larger onion bag, continue increasing evenly, or make another sc round before beginning the mesh. The starting circle should be flat rather than cupped.
Step 2: Start the airy mesh sides
Round 6: Ch 1, sc in the first st, *ch 5, skip next 3 sts, sc in next st*; repeat from * to * until you have 10 ch-5 loops, placing the final sc at the beginning of the next round. Use a stitch marker at the first sc to track the round. Do not join.
Round 7: Sl st into the first ch-5 space, sc in that space, *ch 5, sc in the next ch-5 space* around until you have worked into all 10 spaces. The final ch-5 leads to the following round. Continue working in a spiral, with 10 evenly spaced loops in each mesh round.
Repeat the mesh round until the pouch measures approximately 8–10 in (20–25 cm) tall from its base when laid flat and gently stretched. Stop earlier for a garlic bag or add rounds for more onions.
Step 3: Shape the upper opening
For a neat, narrower top, work one round of *sc in the next ch-5 space, ch 3* across all 10 spaces. On the following round, work 1 sc in each ch-3 space, with no extra chains between them (10 sc). Join with a sl st. Make a second round of sc, working one sc into each sc.
Step 4: Crochet the hanging loop
With the working yarn attached to the top edge, ch 45 (or longer for the desired hanging length). Slip stitch into the stitch directly opposite the starting point, approximately 5 stitches away. Turn and work 1 sc into each chain back toward the starting point. Slip stitch to the beginning, fasten off, and weave in the ends securely. Check the attachment stitches before hanging a filled bag.
Step 5: Make a matching garlic bag
Repeat the pattern with natural cream cotton yarn for garlic. For the onion version, use sage, olive or dusty-green yarn and make the pouch a little longer. Hang the bags side by side for the cozy farmhouse look shown in the inspiration image.
Helpful Tips for a Neater Finish
- Count the mesh spaces at the end of every round so the diamond pattern stays even.
- Choose a slightly smaller hook if your base is too loose.
- Keep the top rim snug but wide enough to remove an onion or garlic bulb.
- Weave in every yarn end firmly, and reinforce the handle attachment if needed.
- Try a shorter body for a garlic bag and a longer one for onions.
How to Store Onions and Garlic Safely
A mesh bag allows airflow, but proper location matters as much as the stitches. Store whole, unpeeled, cured onions and garlic in a cool, dry, dark and well-ventilated place, away from direct sunlight and moisture. Do not place freshly cut or peeled produce in these bags. Keep onions away from potatoes, check the contents regularly, and remove anything soft or moldy.
Because crochet stretches, avoid overfilling the bags. Use a secure hook and keep them away from heat sources, open flames and children’s reach. The bags are for dry pantry produce, not for storing food that requires refrigeration.
Color and Style Ideas
For a calm cottage kitchen, pair cream and muted sage. A terracotta bag creates a warmer farmhouse palette, while oatmeal cotton gives a classic rustic finish. You can also add a small wooden tag or a simple yarn bow near the top, keeping decorations away from the produce and the load-bearing loop.
Frequently Asked Questions
Can beginners crochet these onion and garlic bags?
Yes. If you know chains, single crochet and slip stitches, the repeating mesh rounds are straightforward. Practice the ch-5 loop pattern with scrap yarn before making the full bag.
What is the best yarn for a crochet produce bag?
Firm cotton yarn is a practical option because it provides structure and can be washed. Always test the strength of your finished handle and fabric before adding produce.
Can I machine-wash the bags?
Follow the yarn label’s care instructions. Cotton bags are often washable, but a gentle cycle in a laundry bag and air-drying can help preserve their shape. Empty them before washing.
How many onions fit in one hanging bag?
Capacity depends on onion size, yarn stretch and how firmly you crochet. Begin with just a few bulbs, test the hanging loop, and avoid loading the bag until it pulls out of shape.
More Easy Crochet Projects for Your Kitchen
If you loved this project, try the crochet plastic bag holder or the floral crochet kitchen towel holder. Both make lovely companions to these hanging produce bags.
Final Thoughts
These crochet onion and garlic hanging bags bring together everyday function and handmade charm. Start with the cream garlic bag, then crochet a larger sage onion bag for a coordinated kitchen duo. Save the pattern for your next cozy weekend project!
Leave a Reply