Crochet Winter Ear Warmer Easy Twisted Ribbed Headband for Beginners
A crochet winter ear warmer is a wonderful project when you want something warm, comfortable, and stylish without spending hours making a full hat. This twisted ribbed headband combines a simple crochet stitch with a decorative front detail, creating a practical accessory for chilly mornings and everyday winter outfits.
The design begins with a flat rectangular piece of crochet fabric. Its raised ribbing gives the headband a flexible texture, while a clever joining technique creates the twist at the front. There is no complicated shaping, and the main fabric uses the same stitch throughout.
This project is particularly suitable for beginners who want to improve their stitch consistency and learn how a simple seam can change the appearance of a finished accessory.
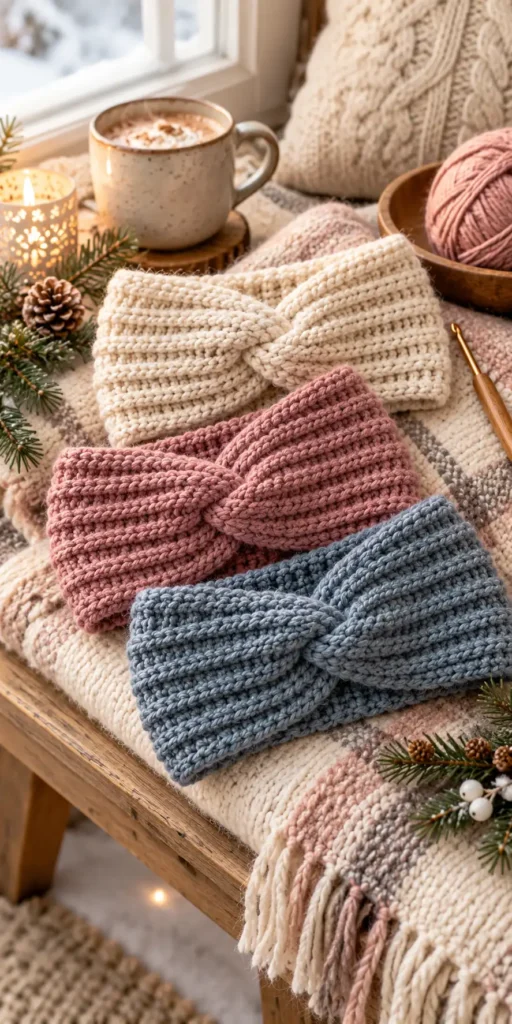
Table of Contents
Why This Crochet Winter Headband Is Worth Making
One of the most appealing features of this ear warmer is its straightforward construction. Unlike a traditional crochet hat, it does not require crown shaping, increases, decreases, or working in continuous rounds.
The headband is worked flat, making it easier to check the fabric and adjust its length as you crochet.
Other useful features include:
- Beginner-friendly construction: The main fabric uses half double crochet stitches.
- Comfortable ribbing: Working into the back loops creates flexible ridges.
- Minimal shaping: The headband starts as a rectangle.
- Adjustable sizing: Its length and width can be modified.
- Practical winter coverage: The finished band protects the forehead and ears while leaving the top of the head uncovered.
- Small yarn requirement: The adult version uses approximately 80–100 yards of worsted-weight yarn.
The decorative twist is formed during assembly rather than through complicated stitch changes. This makes the project approachable while giving the finished accessory a distinctive look.
Skill Level: Beginner
The referenced design is classified as beginner-friendly. It uses a limited number of crochet techniques, although completing the twist requires some care during the finishing stage.
Before starting, it is helpful to be comfortable with making a slip knot, creating chains, working half double crochet stitches, and turning the work at the end of a row.
You should also understand how to crochet into the back loop of a stitch and how to secure yarn ends with a needle.
The main challenge is maintaining even tension across the rectangle. Consistent stitches help the ribbing develop evenly and prevent the edges from becoming irregular.
Materials for the Twisted Ear Warmer
The original project uses accessible supplies and a medium-weight yarn suitable for a warm headband.
Yarn
For an adult ear warmer, the reference recommends approximately 80–100 yards of Category 4 worsted-weight yarn.
Because the finished accessory rests directly against the skin, softness is an important consideration.
Suitable yarn choices mentioned in the original design include:
- Soft acrylic yarn
- Merino wool
- Wool and acrylic blends
- Washable wool
- Soft alpaca blends
Choose a yarn that feels pleasant around your ears and forehead. A yarn with some natural flexibility will also help the headband maintain a comfortable fit.
Crochet Hook
The recommended hook size is 5.0 mm.
Your personal tension can affect the finished fabric, so the reference advises adjusting the hook size when necessary.
Additional Supplies
You will also need:
- Yarn needle for assembling the headband
- Scissors for cutting yarn
- Measuring tape for checking dimensions
- Stitch marker, optional
A measuring tape is especially useful because the rectangle’s finished length is more important than simply following an estimated number of rows.
Crochet Stitch Abbreviations
The original pattern uses US crochet terminology.
| Abbreviation | Meaning |
|---|---|
| ch | Chain |
| hdc | Half double crochet |
| st | Stitch |
| sts | Stitches |
| BLO | Back loop only |
The primary technique is half double crochet worked through the back loop only, commonly written as hdc BLO.
This creates the textured fabric that gives the headband its ribbed appearance.
Finished Measurements and Gauge
The original adult headband is designed to stretch comfortably around an average adult head.
Adult Headband Measurements
| Measurement | Approximate size |
|---|---|
| Rectangle width | 4–4½ inches |
| Rectangle length before joining | 19–20 inches |
| Intended head circumference | 21–23 inches |
| Yarn requirement | 80–100 yards |
The rectangle is intentionally shorter than the circumference of the wearer’s head. This allows the fabric to stretch slightly when worn.
A headband that matches the exact head circumference without accounting for stretch may feel loose after repeated use.
Crochet Gauge
The reference provides an approximate gauge of:
- 13 half double crochet stitches = 4 inches
- 9 rows = 4 inches
Although these figures provide a useful starting point, checking the dimensions of the finished rectangle is essential.
The amount of stretch can vary according to the yarn, hook size, and individual crochet tension.
Understanding the Ribbed Crochet Texture
The characteristic ridges in this headband are created with half double crochet stitches worked through the back loop.
A regular crochet stitch has two visible loops along its upper edge, forming a small V shape.
Normally, a crocheter inserts the hook beneath both loops. When using the BLO technique, the hook enters only the loop farther away from the crocheter.
Leaving the other loop unworked produces a raised line in the fabric.
As more rows are added, these raised lines create the ribbed effect.
Why Back-Loop Crochet Works Well
Back-loop stitching offers both texture and flexibility.
The ridges allow the fabric to expand more comfortably than a similarly constructed piece with a flatter surface. This is particularly helpful for an accessory that needs to fit securely without feeling restrictive.
The resulting texture also adds visual interest to a simple rectangular shape.
How the Twisted Crochet Ear Warmer Is Constructed
The headband consists of a single crocheted rectangle that is joined at its shorter ends.
The original design is worked back and forth using half double crochet stitches, with back-loop stitching forming the ribbing after the initial foundation.
Rather than introducing increases or decreases, the rectangle retains a consistent width as it grows.
Once the desired length is reached, the two shorter edges are brought together using a folded, interlocking arrangement.
Sewing through the layered fabric creates the central twist.
Creating the Rectangular Fabric
The starting chain determines the approximate width of the band.
Additional rows determine how far the rectangle will wrap around the head.
The original adult version begins with a foundation chain of 15, producing a sample width of approximately 4–4½ inches when worked to the stated dimensions.
However, the exact finished size depends on gauge.
For the complete row-by-row directions, consult the original twisted crochet ear warmer pattern from Crochet Mirth.
Checking the Fit Before Joining
Before sewing the rectangle into a headband, wrap it gently around the intended wearer’s head.
The fabric should stretch slightly as the ends meet. The goal is a secure fit that does not create uncomfortable pressure.
If the rectangle closes without needing any stretch, the finished headband may be too loose.
If considerable pulling is required, the rectangle may need more length.
Testing the fit before assembly is especially important because correcting the size becomes less convenient after the seam is completed.
Understanding the Twisted Seam
The center twist comes from the arrangement of the two short ends rather than from a separately crocheted decoration.
In the original construction, the ends are folded and interlocked to form four fabric layers. These layers are then stitched together to secure the shape.
After the headband is turned and adjusted, the folded seam forms the twisted front detail.
The important considerations are that the layers remain correctly positioned and that the sewing passes through the entire layered seam.
The original pattern contains the full folding and joining instructions.
Finishing the Headband
After assembly, the remaining yarn ends are secured and woven into the fabric.
The twisted section can then be arranged gently with your fingers so that the folds sit evenly.
Check that the ribbed edges lie comfortably and that the central seam does not feel excessively bulky.
Adjusting the Headband for Different Sizes
One benefit of rectangular construction is that the finished dimensions can be adapted without changing the overall design.
The starting width and total length serve different purposes.
Changing the starting chain changes how much of the forehead and ears the band covers. Changing the number of completed rows adjusts its circumference.
Adult Size Guide
The reference includes these approximate measurements:
| Head circumference | Suggested rectangle length |
|---|---|
| 20–21 inches | 18–18½ inches |
| 21–22 inches | 18½–19½ inches |
| 22–23 inches | 19–20 inches |
| 23–24 inches | 20–21 inches |
These are guidelines rather than guaranteed finished sizes. The fabric’s elasticity and the wearer’s preferred fit should guide final adjustments.
Child and Toddler Sizes
For children, the original article suggests reducing the rectangle’s length and, where appropriate, its width.
For a child with a head circumference of approximately 19–20 inches, the suggested rectangle length is 17–18 inches.
For toddlers with a head circumference of approximately 18–19 inches, the reference suggests a rectangle around 16–17 inches long and 3–3½ inches wide.
Because children’s head sizes vary, measuring the intended wearer is preferable to relying solely on age categories.
Teen Sizes
Many teenagers may fit an adult-sized headband.
The reference recommends measuring the head and accounting for approximately 1½–2½ inches of negative ease, depending on the stretch of the crochet fabric.
Making the Band Wider or Narrower
A wider headband provides more fabric around the ears and creates a fuller-looking twist.
A narrower headband produces a slimmer accessory with a less prominent center detail.
The reference suggests modifying the foundation chain for these variations, while adjusting the finished length separately to maintain a suitable fit.
Choosing Yarn for a Comfortable Winter Ear Warmer
Yarn selection affects warmth, texture, stretch, and everyday comfort.
Acrylic Yarn
Soft acrylic is a practical option for an accessory that may be worn regularly.
It is widely available in different colors and is often relatively affordable.
Many acrylic yarns are also easy to care for, although washing instructions depend on the specific product.
Wool Yarn
Wool is well suited to cold-weather accessories because of its insulating properties.
When choosing wool for an ear warmer, consider its texture carefully. Some varieties may feel rough against sensitive skin, particularly around the forehead.
Soft merino wool is one option identified in the reference.
Wool Blends
Wool and acrylic blends can offer a useful balance of warmth, flexibility, softness, and practical care.
The proportions of the fibers affect the finished texture, so choose a blend that feels comfortable and works well with the recommended gauge.
Color Ideas and Creative Variations
The simple ribbed surface makes this headband suitable for different color combinations.
Solid colors emphasize the stitch texture and allow the twisted center to remain the main design feature.
The reference suggests winter-friendly shades such as forest green, cream, burgundy, charcoal, camel, navy, rust, mustard, sage, and cranberry red.
Two-Color Headband
The original article describes a variation using two yarn colors across the rectangle.
Color combinations include forest green with cream, burgundy with blush, and charcoal with mustard.
This approach adds contrast while keeping the same basic headband shape.
Striped Headband
Another option described in the source is changing colors at intervals to create stripes.
The reference suggests color changes every 4–6 rows for this variation.
Coordinating yarn remnants can make this an appealing small project for using materials already in your collection.
Scrap Yarn Combinations
A mixture of leftover yarn shades can create a distinctive accessory.
The reference offers seasonal palettes such as green, sage, and cream for a woodland-inspired appearance, or rust, mustard, and camel for warmer autumn tones.
For the most consistent result, consider how the different yarn remnants compare in thickness and stretch.
Other Yarn Weights and Optional Warmth
The original design is based on worsted-weight yarn, but the article also discusses possible variations using different weights.
Bulky Yarn
Category 5 bulky yarn can produce a thicker headband.
The reference suggests a 6–7 mm hook as a starting point for this alternative.
Because the stitches are larger, the original stitch and row counts would need adjustment. Finished measurements should guide the construction.
DK Yarn
DK yarn offers a lighter alternative.
The reference suggests approximately a 4–4.5 mm hook, while noting that more stitches and rows may be needed to achieve the same dimensions.
Fleece-Lined Version
For additional protection against cold and wind, the reference describes adding a thin fleece lining inside the band.
The lining should be arranged so that the crochet fabric can still stretch comfortably.
This variation adds an extra finishing step but may be useful for colder conditions.
Why This Design Works for Beginners
The headband introduces several useful crochet skills without requiring complex shaping.
Repeated rows provide an opportunity to practice even tension and consistent stitch placement.
Working into the back loop also helps beginners recognize stitch anatomy and understand how inserting the hook differently changes the fabric.
The finishing process introduces basic assembly techniques, including folded construction and sewing crochet fabric securely.
Because the headband is smaller than a scarf or blanket, the repetitive section is manageable for someone building confidence with crochet.
Handmade Winter Gifts and Matching Accessories
A twisted ear warmer can be a practical handmade gift, particularly when made in the recipient’s preferred color.
The reference suggests simple packaging such as kraft paper, ribbon, or natural twine.
The finished headband can also be paired with other cold-weather accessories made from coordinating yarn.
Matching scarves, mittens, beanies, cowls, or fingerless gloves can help create a cohesive winter set.
For crocheters preparing items for a seasonal craft fair, the original article also suggests offering headbands in different colors and displaying the twisted detail prominently.
Common Problems and How to Avoid Them
Even with a straightforward rectangle, a few details can influence the finished result.
The Headband Feels Too Loose
A rectangle that is too long may produce a headband that slips during wear.
Before joining, check that the fabric needs a little stretch to fit around the head.
The Headband Feels Too Tight
Insufficient length can make the finished accessory uncomfortable.
If the ends cannot meet without substantial tension, increase the rectangle’s length before sewing.
The Ribbing Looks Uneven
Inconsistent stitch placement can interrupt the ribbed texture.
Pay attention to the back loops and keep your tension reasonably steady throughout the fabric.
The Stitch Count Changes
Accidentally missing or adding stitches can produce uneven edges.
The original adult sample maintains 14 stitches across its rows, so counting periodically is a useful way to spot mistakes early.
The Center Twist Does Not Sit Correctly
The folded ends must be arranged in the intended interlocking position before sewing.
If the layers are incorrectly stacked, the front detail may not form as expected.
A secure seam passing through all four layers is important for holding the twist together.
The Seam Feels Bulky
Pulling the sewing yarn too tightly can make the twisted section stiff.
Aim for a secure seam that holds the fabric in position without unnecessarily compressing the folds.
Blocking and Caring for Your Crochet Ear Warmer
Proper finishing and care can help the headband retain its appearance.
Blocking the Finished Fabric
Blocking is optional for this design.
If the edges curl or the rectangle looks slightly uneven, gentle blocking may improve the shape.
Avoid stretching the fabric excessively during the process, since the headband relies on some elasticity for a comfortable fit.
Washing the Headband
The appropriate washing method depends on the yarn’s fiber content and care instructions.
The original article recommends gentle handling, avoiding excessive heat, reshaping the fabric while damp, and laying the accessory flat to dry.
Once dry, the twisted section can be adjusted by hand to restore its appearance.
Frequently Asked Questions
Can I Make This Headband Without the Twist?
Yes. The reference explains that the rectangular fabric can be joined with a regular seam instead of the folded twist.
This creates a classic ribbed headband with a simpler front appearance.
Can I Use Single Crochet Instead of Half Double Crochet?
The original article identifies single crochet worked through the back loop as a possible alternative.
This produces smaller, denser stitches and requires adjustments to the project dimensions and number of rows.
Can I Use Regular Half Double Crochet?
Yes, but the surface texture will change.
Working standard half double crochet through both loops creates a flatter fabric than the back-loop technique used in the original design.
Is a Crochet Ear Warmer as Warm as a Hat?
An ear warmer covers the forehead, ears, and sides of the head but leaves the crown uncovered.
It can be comfortable for cool weather or moderate winter conditions, although it does not provide the same full-head coverage as a beanie.
Final Thoughts
A twisted ribbed ear warmer shows how a simple crochet rectangle can become a useful winter accessory through thoughtful finishing.
The back-loop half double crochet texture provides flexibility, the adjustable dimensions make it suitable for different wearers, and the folded seam adds an attractive detail without requiring advanced stitch work.
Whether made in a classic neutral shade, a rich seasonal color, or a combination of leftover yarns, this project offers a practical way to develop crochet skills while creating something wearable.
Leave a Reply