Pumpkin Bear Crochet A Charming Amigurumi Project for Fall
The Pumpkin Bear is an adorable crochet project that combines the familiar features of a teddy bear with the warm colors of autumn. With its rounded orange body, brown head, little paws, and miniature pumpkin hat, this handmade amigurumi brings a playful seasonal touch to your crochet collection.
Originally designed by Erica Dietz of 5 Little Monsters, this bear was introduced in September 2021 as part of the third annual Halloween Crochet Along organized with CAL Central. Rather than creating a traditional Halloween character with spooky details, the designer chose a simpler pumpkin-inspired appearance that works throughout the fall season.
The finished bear measures approximately 7 inches tall when sitting. Its construction also keeps assembly manageable by working the body and head together, while the smaller features are crocheted separately and attached afterward.
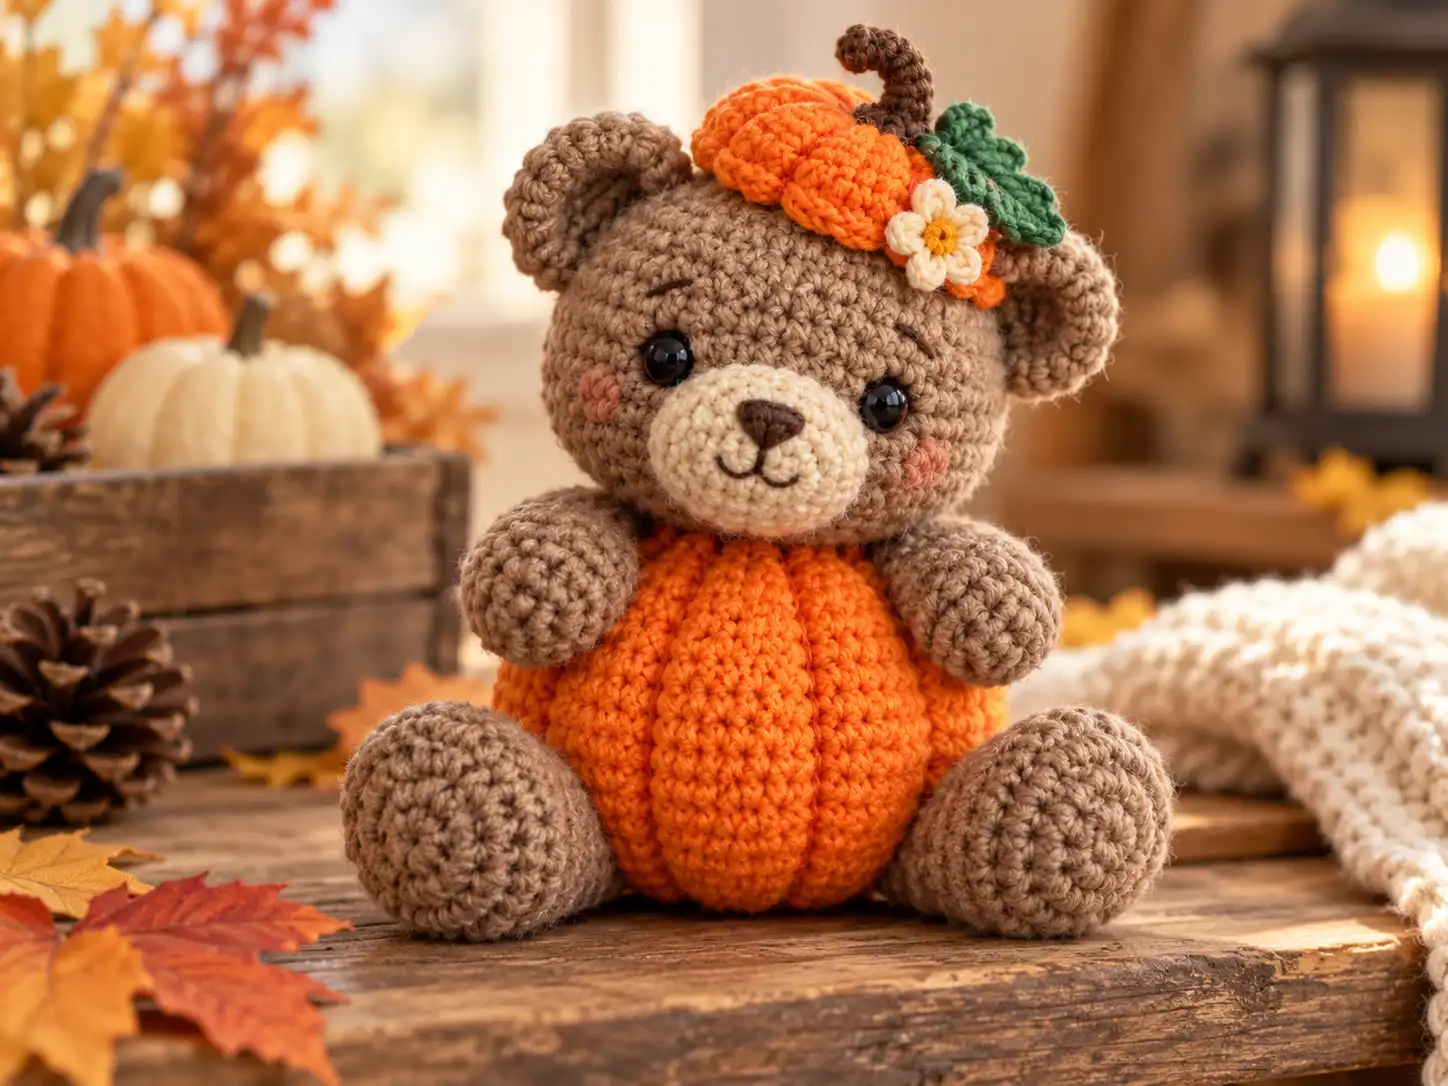
Table of Contents
What Makes the Pumpkin Bear Special?
One of the most appealing features of this design is the way the bear’s body doubles as a pumpkin. The orange section has a smooth, rounded shape, while the brown head and limbs preserve the recognizable appearance of a teddy bear.
The original designer considered adding raised pumpkin sections and a jack-o’-lantern face but ultimately preferred a more understated look. This choice makes the character suitable for both Halloween decorations and general autumn displays.
The little pumpkin hat adds another seasonal detail. Its orange base is finished with a brown stem and a curling green vine, creating a recognizable pumpkin decoration without overwhelming the bear’s face.
Because the completed figure is designed to sit, it also works well as a small handmade decoration on a shelf or among other fall crochet creations.
Materials Needed for the Pumpkin Bear
This project uses worsted-weight yarn and a small collection of standard amigurumi supplies. The original pattern specifies four yarn colors and provides the exact yarn shades used in the sample.
Yarn and Colors
- Brown worsted-weight yarn: Red Heart Super Saver in Cafe Latte, used for the bear’s head, arms, legs, ears, and pumpkin stem.
- Orange worsted-weight yarn: Red Heart Super Saver in Pumpkin, used for the rounded body and miniature pumpkin hat.
- Tan worsted-weight yarn: Red Heart Super Saver in Buff, used for the muzzle.
- Green worsted-weight yarn: Red Heart Super Saver in Hunter Green, used for the decorative vine.
The tan and green yarns are needed only in small amounts. The source does not specify exact yarn quantities, so the amount required for each color is not provided.
Crochet Tools and Additional Supplies
Along with the yarn, gather the following:
- G crochet hook (4.0 mm)
- Fiberfill stuffing
- Two 11 mm safety eyes
- One 13 mm safety nose
- Yarn needle
- Scissors
These supplies are taken from the original design. The pattern does not state a specific gauge or formal skill-level classification.
How the Pumpkin Bear Is Crocheted
The construction follows a typical amigurumi approach, with rounded pieces formed through increases, decreases, and continuous shaping.
The source uses US crochet terminology, including single crochet (sc), half double crochet (hdc), double crochet (dc), slip stitch (sl st), chain (ch), and single crochet two together (sc2tog).
Most components begin with a magic ring. The exceptions are the pumpkin stem and vine, which start with foundation chains.
The main body and head are crocheted together from the bottom upward. The remaining pieces are made individually before the bear is assembled.
Creating the Orange Body and Brown Head
The bear begins at the bottom of the orange pumpkin body.
The crocheted fabric gradually expands to form a rounded shape before narrowing toward the neck. This orange section becomes the bear’s plump, pumpkin-inspired belly.
Brown yarn is then introduced to create the head directly above the body. Working the two sections as one continuous structure eliminates the need to sew the head onto the body separately.
Fiberfill is added as the work progresses, helping the orange body and brown head maintain their rounded shapes.
The original design positions the safety eyes on the front of the head before the upper rounds are closed. Their placement contributes to the bear’s friendly expression.
Crocheting the Arms
The Pumpkin Bear has two matching brown arms.
Each arm begins with a magic ring and is shaped into a rounded end that continues into a narrower section. This creates the soft, familiar appearance of a teddy bear’s paws.
The arms are completed individually, with yarn tails left for attaching them later.
During assembly, their ends receive a small amount of stuffing before they are sewn to the sides of the body near the transition between the orange and brown sections.
Making the Legs
The two brown legs are worked separately using the same general amigurumi shaping techniques.
Their rounded ends provide the appearance of small bear feet, while the upper sections connect to the pumpkin body.
The original designer positions the legs to help the completed bear sit. This is an important construction detail because the legs influence the character’s overall pose.
Each leg is finished with a yarn tail for sewing, and the ends are lightly stuffed during assembly.
Shaping the Bear’s Ears
Two small brown ears complete the teddy bear silhouette.
These rounded pieces are crocheted from magic rings and attached near the upper sides of the head.
The ears are curved slightly during attachment so they follow the shape of the head rather than appearing completely flat.
Their placement also leaves space at the top of the head for the miniature pumpkin hat.
Adding the Tan Muzzle
The muzzle provides a lighter contrast against the brown head and helps define the bear’s face.
It is crocheted with tan yarn and shaped into a small oval-like piece. The original design uses a 13 mm safety nose positioned slightly above the center of the muzzle.
The muzzle is sewn beneath the eyes and receives a little stuffing during attachment, giving the face a softly raised appearance.
Making the Miniature Pumpkin Hat
The small pumpkin hat is one of the details that gives this design its autumn personality.
Rather than resembling a full-sized wearable hat, it is a decorative pumpkin-shaped accent secured between the bear’s ears.
Crocheting the Orange Hat
The hat begins with orange yarn and a magic ring.
The rounds form a compact circular piece, with the outer edge shaped using a combination of single crochet, half double crochet, and double crochet stitches.
This produces a slightly decorative edge that gives the pumpkin top more definition.
A yarn tail is retained so the finished piece can be attached securely to the bear’s head.
Creating the Brown Stem
The stem is a small crocheted element worked from a chain using brown yarn.
It is attached at the center of the orange hat, where it becomes the finishing detail that identifies the decoration as a pumpkin.
The ends of the yarn are used to secure the stem to the hat.
Adding the Green Curly Vine
A short green vine completes the pumpkin decoration.
The original pattern creates the vine from a foundation chain worked with slip stitches. The resulting piece forms a small curl.
Once finished, the vine is secured near the stem at the center of the orange hat.
Together, the stem and vine give the miniature pumpkin its recognizable character.
Assembling the Pumpkin Bear
After the main crocheted pieces are finished, the bear is brought together through several straightforward sewing steps.
The original design organizes assembly around the facial features, ears, limbs, and decorative hat.
Attaching the Face and Ears
The tan muzzle is positioned on the front of the head beneath the safety eyes. A little fiberfill adds dimension as it is sewn in place.
Next, the two ears are attached to the upper sides of the head. Their curved placement helps them sit naturally against the rounded surface.
The contrast between the brown head, tan muzzle, and dark safety features establishes the bear’s facial expression.
Positioning the Arms and Legs
The arms are attached near the top of the orange body, close to the point where the brown head begins.
The legs are sewn onto the lower part of the body. In the original design, the creator checked their positioning while the bear was sitting, allowing the final pose to guide attachment.
This placement is worth paying attention to because the finished bear is intended to remain in a seated position.
Securing the Pumpkin Hat
The completed orange pumpkin hat is sewn onto the top of the brown head between the ears.
Its brown stem and green vine should remain visible once it is attached.
The hat serves as the final decorative element, connecting the bear’s appearance to the pumpkin theme of its body.
A Simple Pumpkin Design With Room for Personality
The original Pumpkin Bear intentionally features a plain orange belly. However, the designer also mentions the possibility of adding a jack-o’-lantern face for a more Halloween-specific version.
Three decorative approaches are suggested in the source:
- Crocheted appliqués attached to the orange body
- Felt pieces shaped into facial features
- Embroidered details worked directly onto the pumpkin section
These are optional embellishment ideas rather than additional instructions included in the original pattern.
Leaving the belly plain preserves the soft teddy bear appearance and gives the project a broader autumn theme. Adding a pumpkin face would create a more explicitly Halloween-inspired character.
Both approaches build on the same recognizable combination of a bear and a pumpkin.
A Handmade Bear for the Autumn Season
The Pumpkin Bear brings together two familiar crochet themes in one compact amigurumi figure. Its orange pumpkin body supplies the seasonal character, while the brown paws, rounded ears, and expressive face keep the warmth of a traditional teddy bear.
The one-piece body-and-head construction reduces some of the sewing, and the separately crocheted limbs, muzzle, and pumpkin hat provide the finishing details that define the design.
Whether displayed during Halloween or kept out for the wider fall season, this approximately 7-inch bear is a charming example of how simple shapes and thoughtful color choices can create a distinctive crochet character.
Conclusion
The Pumpkin Bear is a delightful crochet project that brings together the charm of a handmade teddy bear and the cozy atmosphere of autumn. Its rounded orange body, soft brown features, and miniature pumpkin hat create a cheerful seasonal character suitable for Halloween and fall decorations.
With its thoughtfully designed construction and playful finishing details, this amigurumi project offers an enjoyable opportunity to practice shaping, stuffing, and assembling crocheted pieces. Whether displayed on a shelf, included in an autumn collection, or made as a handmade gift, the finished bear adds a warm, personal touch to seasonal décor.
Frequently Asked Questions About the Pumpkin Bear
1. Is the Pumpkin Bear suitable for beginner crocheters?
The original pattern does not specify an official skill level. However, the project involves common amigurumi techniques, including working in rounds, increasing, decreasing, stuffing, and sewing separate pieces together. Crocheters who are already comfortable with these techniques should find the construction familiar.
2. How big is the finished Pumpkin Bear?
According to the original designer, the finished bear measures approximately 7 inches tall in a sitting position. The final size may vary depending on individual crochet tension and the materials used.
3. Is the pumpkin hat made separately from the bear?
Yes. The miniature pumpkin hat is crocheted separately using orange yarn, with a brown stem and green curling vine added as decorative details. Once completed, the hat is sewn onto the top of the bear’s head between its ears.
4. Can I add a Halloween face to the orange pumpkin body?
Yes. The original designer mentions adding jack-o’-lantern features as an optional variation. Crocheted appliqués, felt shapes, or embroidery can be used to decorate the orange body. The original version leaves the pumpkin belly plain for a simpler autumn-inspired appearance.
Leave a Reply