Plushie Ghost Crochet Pattern: Make an Adorable Soft Ghost with a Witch Hat or Bow
Looking for a cute Halloween project that combines soft textures with playful details? This plushie ghost Crochet Pattern is a charming way to create a small, squishy ghost with a ruffled base and a friendly face. Made with super bulky yarn, the design features a rounded body, decorative waves along the bottom, and two optional accessories: a black witch hat or a lavender crochet bow.
The project comes from Katie Gets Creative and includes detailed photographs to help crocheters understand the shaping techniques. Although the finished ghost looks decorative and detailed, its construction relies mainly on basic crochet stitches, increases, and decreases.
The completed ghost measures approximately 5 inches tall without accessories, making it a compact seasonal decoration or handmade gift.
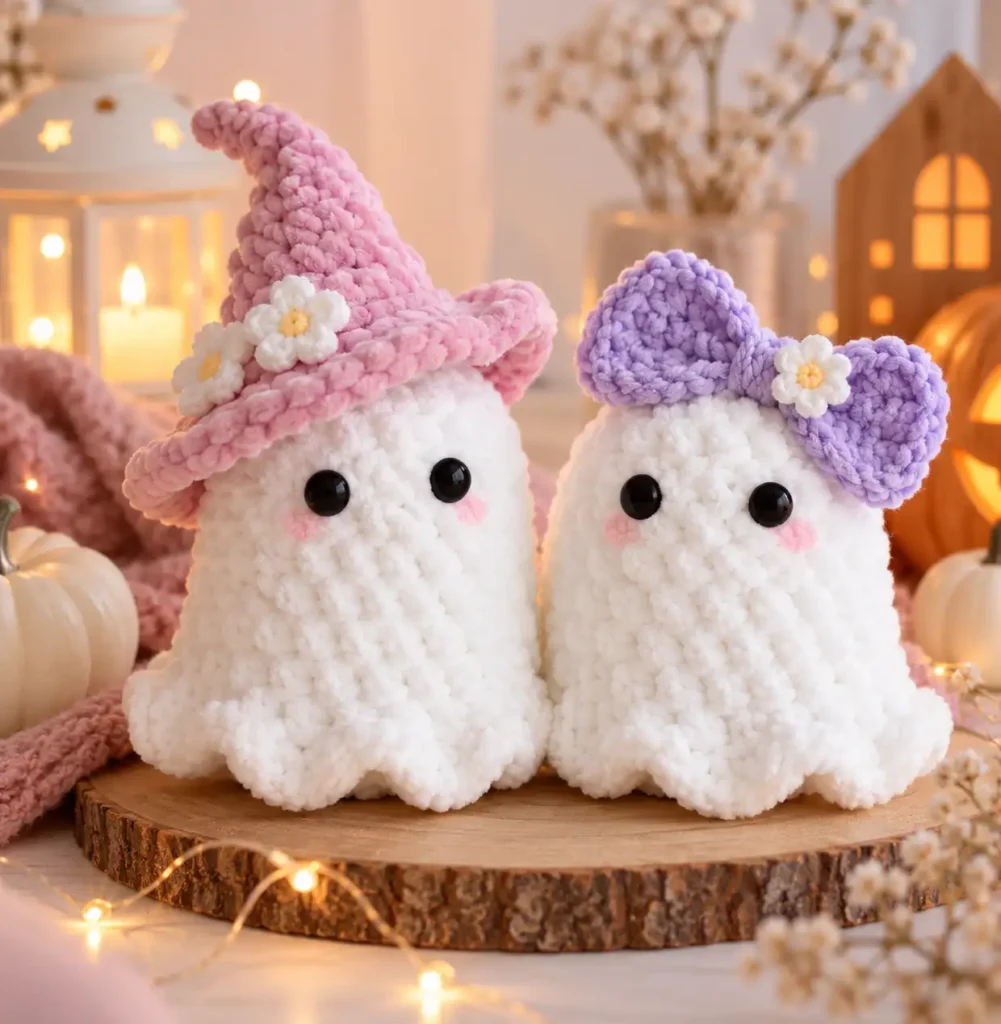
Table of Contents
Getting Ready for the Plushie Ghost Crochet Pattern
Before beginning, gather the yarn, hooks, stuffing, and finishing tools. The original design uses different yarn weights for the ghost and its accessories, allowing each piece to have its own texture and structure.
Materials and Supplies
The following supplies are specified in the original project:
| Material | Specification |
|---|---|
| Crochet hooks | 7.0 mm and 4.0 mm |
| Ghost yarn | Bernat Blanket, White, #6 super bulky |
| Witch hat yarn | Chenille Home Slim, Black, bulky weight |
| Bow yarn | I Love This Yarn, Lavender Sparkle, #4 worsted weight |
| Safety eyes | 10 mm or 12 mm |
| Stuffing | Polyester fiberfill, such as Poly-fil Ultra Plush |
| Additional tools | Scissors, stitch marker, tapestry needle |
The 7.0 mm hook is used for the ghost and witch hat, while the 4.0 mm hook is used for the smaller bow.
The original pattern does not specify exact yarn quantities or a stitch gauge. Yarn thickness can influence the shape and height of the ghost, even when using yarns from the same brand.
Crochet Stitches and Abbreviations
The pattern uses US crochet terminology.
| Abbreviation | Meaning |
|---|---|
| SC | Single crochet |
| Ch | Chain |
| Ch-sp | Chain space |
| Inc | Increase, working two single crochets into one stitch |
| Dec | Decrease |
| HDC | Half double crochet |
| 3 HDC inc | Three half double crochet stitches worked into one stitch |
| 3 HDC dec | A decrease combining three half double crochet stitches |
| Sl st | Slip stitch |
| BLO | Back loop only |
| FLO | Front loop only |
The design also uses a magic ring to begin the crocheted pieces and an invisible fasten-off technique for a neater finish.
For the ghost’s body, the designer recommends a yarn-under, yarn-over method when making single crochet stitches. This approach creates compact stitches that help reduce visible gaps in the plush fabric.
Important Construction Notes
The ghost and witch hat are crocheted in continuous spiral rounds. Instead of joining each round with a slip stitch, a stitch marker identifies the beginning of the next round.
Avoid pulling the first few rounds too tightly. Excessive tension can cause the top of the ghost to develop a pointed shape rather than a smooth, rounded head.
The designer also explains that the body length may need adjusting depending on the thickness of the plush yarn. Thicker yarn can produce the desired height with fewer rounds, while softer or thinner yarn may require additional rounds before the lower shaping begins.
The intended finished height is approximately 5 inches without the hat or bow.
Understanding the Ghost Body Construction
The ghost is created as one stuffed crochet piece, with its decorative ruffles formed directly into the lower body.
Rather than making separate fabric panels and sewing them together, the project uses circular construction to shape the head, sides, ruffled edge, and base.
Forming the Rounded Head
The ghost begins with a magic ring and a small circle of single crochet stitches.
Gradual increases expand this circle into a rounded top. Maintaining even tension during this stage helps create a smooth silhouette.
As the circle grows, the fabric begins to curve downward, establishing the shape of the ghost’s head.
The original tutorial provides photographs of the early rounds, which are particularly helpful for recognizing stitch placement in thick chenille-style yarn.
Building the Soft Ghost Body
Once the top reaches its intended width, the pattern continues with single crochet rounds to create the sides.
This section gives the ghost its recognizable upright shape.
Because the yarn is thick and plush, the stitches create a soft surface without requiring complicated texture patterns.
The designer notes that the body measures approximately 4 inches from the top before the lower decorative shaping begins in the demonstrated version.
This measurement is a useful reference, although the precise appearance depends on the yarn’s thickness and how firmly the stitches are worked.
Creating the Wavy Lower Edge
One of the most distinctive features of this ghost is the scalloped border around its base.
The ruffles are made using a combination of increases and half double crochet stitches. Groups of stitches add fullness to selected areas, forming small rounded waves.
The following decrease section shapes those waves and brings the stitch count back down.
The finished design has eight decorative ruffles around the bottom.
This shaping requires attention to stitch placement because the bulky yarn can make individual loops difficult to identify. The original tutorial highlights the importance of finding the correct stitch immediately after each group of half double crochets.
Shaping the Bottom of the Ghost
After the ruffles are formed, additional decreases narrow the lower opening.
The ruffled edge is positioned toward the outside of the work so it remains visible when the ghost is finished.
The lower section also provides the foundation that allows the plushie to sit upright.
Keeping the bottom relatively flat is important. Too much stuffing near the base can distort the shape and make the ghost less stable.
Adding the Face and Stuffing
The ghost’s expression is created with two safety eyes placed on the front of the body.
In the original design, the eyes are positioned between rounds 6 and 7, approximately three stitches apart. Their placement is centered in relation to the front ruffle, with the beginning-of-round marker positioned at the back.
Because plush yarn creates relatively large stitches, the designer suggests placing a piece of felt behind the eyes before attaching their safety backs to improve their hold.
Safety eyes can still present a choking hazard if detached, so embroidered eyes are a safer option for items intended for babies or young children.
Filling the Ghost
Polyester fiberfill gives the ghost its soft, rounded appearance.
The designer recommends light stuffing rather than packing the body firmly. The goal is to maintain a squishy texture while providing enough support for the ghost to hold its shape.
Stuffing should reach into the decorative ruffles so they appear full and rounded.
Before closing the bottom, check that the body looks balanced and that the filling has not created a bulge underneath.
Closing and Securing the Base
The final opening is closed with a tapestry needle and the remaining yarn tail.
The closing technique draws the lower stitches together, securing the stuffing inside the ghost.
Once the opening is closed, the yarn end is woven through the fabric and concealed inside the plushie.
This finishing method avoids an exposed seam and helps preserve the smooth appearance of the completed piece.
Crocheting the Mini Witch Hat
The first optional accessory is a small black witch hat made with bulky chenille yarn and a 7.0 mm crochet hook.
Its construction begins at the pointed top and gradually widens through a series of increases.
The hat is crocheted in continuous rounds, just like the ghost body.
As the piece grows, the increases form the tapered cone. The brim is then created by changing the stitch placement and increasing the circumference.
Working through the back loops in the transition section helps define the separation between the upright hat and its brim.
Additional rounds shape the outer edge before the yarn is fastened off and the ends are woven in.
The black chenille texture complements the white plush body, creating a traditional Halloween color combination.
Making the Lavender Moss Stitch Bow
For a softer alternative to the witch hat, the original project includes a lavender bow made with worsted-weight yarn.
Unlike the ghost and hat, which are worked in spiral rounds, the bow begins as a flat rectangular piece.
Creating the Moss Stitch Fabric
The bow uses moss stitch, a textured crochet pattern created by alternating single crochet stitches and chain spaces.
A 4.0 mm crochet hook is paired with lavender worsted-weight yarn to produce a smaller, more defined fabric.
The original bow is worked as a rectangle measuring approximately 4.5 inches across its longer dimension.
A single crochet border is added around the rectangle to give the edges a tidy finish.
Shaping and Attaching the Bow
Once the rectangle is complete, its center is gathered using a tapestry needle and a length of matching yarn.
Wrapping yarn around the gathered middle creates the narrow center of the bow while allowing the outer sections to spread into two loops.
The center wrapping is secured, and the remaining yarn is used to attach the bow to the ghost.
In the reference design, the bow sits near the top of the head, giving the plushie a different appearance from the witch-hat version.
A Soft Halloween Crochet Project with Two Finishing Styles
This plushie ghost combines straightforward amigurumi construction with decorative shaping that gives the finished piece its personality.
The rounded head and softly stuffed body create a simple silhouette, while the eight lower ruffles add texture and movement. The witch hat introduces a classic Halloween detail, and the lavender bow offers a lighter, playful variation.
The project is particularly approachable for crocheters who already understand basic single crochet stitches and want to practice increases, decreases, spiral rounds, and simple finishing techniques. The original designer also provides step-by-step photographs for beginners who find written crochet shorthand challenging.
Whether finished with a pointed black hat or a lavender bow, the result is a small, soft ghost with a handmade character.
Conclusion
This plushie ghost Crochet Pattern brings together soft textures, simple shaping, and charming Halloween details in one creative project. Its rounded body, playful ruffled base, and optional accessories make it a delightful addition to seasonal decorations or a thoughtful handmade gift.
The design offers an opportunity to practice essential crochet techniques, including working in continuous rounds, increasing, decreasing, and shaping with half double crochet stitches. Choosing between the classic black witch hat and the lavender moss stitch bow also allows you to give your finished ghost a personal touch.
Frequently Asked Questions
Is this plushie ghost Crochet Pattern suitable for beginners?
The project is approachable for beginners who are familiar with basic crochet stitches. It uses techniques such as single crochet, increases, decreases, and working in continuous rounds. The ruffled base requires extra attention to stitch placement, but the original tutorial includes photographs to help explain the process.
What type of yarn is used to crochet the ghost?
The original design uses Bernat Blanket white super bulky yarn (#6) for the ghost’s body. This plush yarn creates a soft, squishy texture. The optional witch hat uses black bulky chenille yarn, while the lavender bow is made with worsted-weight yarn.
How can I prevent the ghost from becoming too pointed or overstuffed?
Avoid pulling the stitches too tightly when forming the first few rounds of the head. Maintaining even tension helps create a rounded shape. When adding polyester fiberfill, distribute it gently throughout the body and ruffles without packing the base too firmly. This helps preserve the ghost’s soft appearance and allows it to sit more evenly.
Can I make the ghost without the witch hat or bow?
Yes. Both accessories are optional, and the ghost can be displayed without either one. The rounded white body, safety eyes, and decorative ruffled base create a complete design on their own. You can also choose between the witch hat and bow depending on the appearance you prefer.
Leave a Reply