
Crochet Hanging Mesh Bag Holder: Easy DIY Storage Pattern
Looking for a pretty way to organize lightweight kitchen essentials? This crochet hanging mesh bag holder combines airy openwork stitches, a charming scalloped edge, and practical hanging loops. Inspired by the cream and charcoal holders pictured above, this original beginner-friendly variation looks lovely on a pantry hook, kitchen wall, or craft-room peg.
Pattern note: The photograph is design inspiration. The instructions below are an original interpretation, not the original designer’s exact pattern. The sample is intended for storing lightweight items, such as clean reusable produce bags or soft cloths, not heavy or sharp objects.
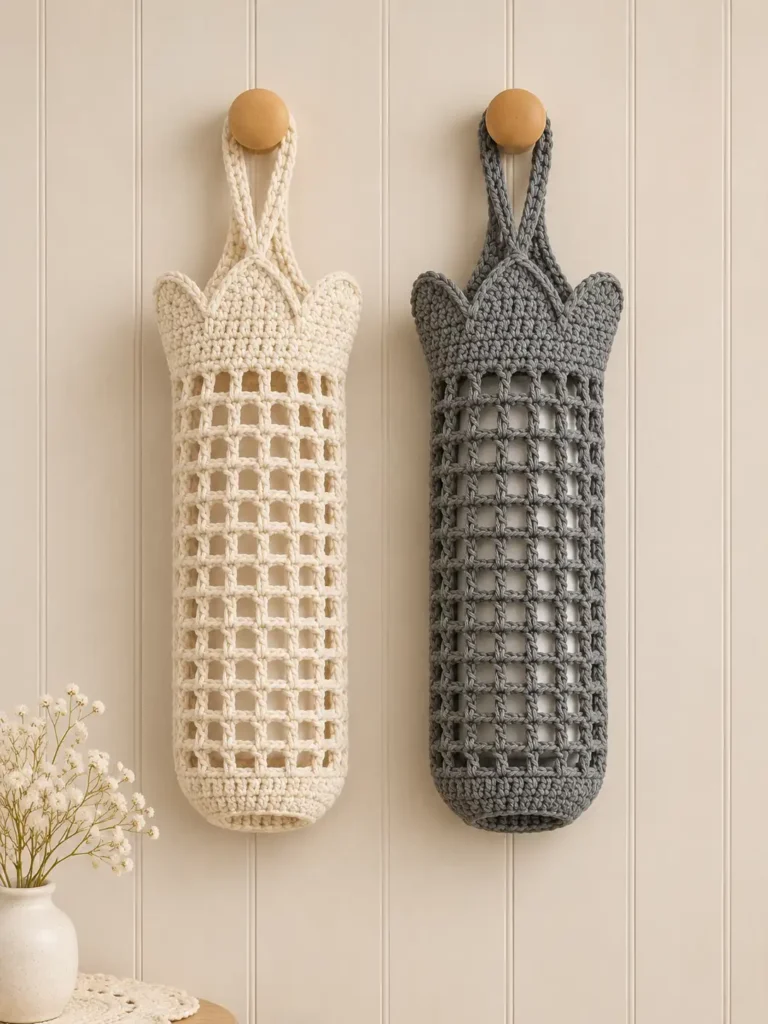
Table of Contents
Why You’ll Love This Hanging Crochet Organizer
- Uses simple chains, single crochet, and double crochet stitches.
- Works up in a repeating mesh pattern that’s easy to customize.
- Adds a handmade, textured accent to small spaces.
- Makes a thoughtful housewarming or craft-fair gift.
Materials You’ll Need
- Approximately 100–150 yards (90–140 m) of medium-weight cotton yarn; actual usage varies by size and gauge.
- 4.0 mm crochet hook, or a hook suitable for your yarn.
- Stitch marker, yarn needle, and scissors.
- Optional: a small removable hook for hanging.
Skill Level, Size, and Abbreviations
Skill level: Confident beginner. Terminology: US crochet terms. Approximate finished size: 5–6 in (13–15 cm) across when flattened and 11–13 in (28–33 cm) tall before the hanging loops. Exact dimensions depend on yarn, tension, and the number of mesh rounds.
- ch = chain
- sc = single crochet
- dc = double crochet
- sl st = slip stitch
- sp = space
- st = stitch
- rep = repeat
Crochet Hanging Mesh Bag Holder: Step-by-Step Pattern
1. Make the Lower Opening
Ch 36 loosely and join with a sl st to the first ch, taking care not to twist. The starting chain forms a small opening at the bottom. If you plan to store very small items, consider adding a fabric liner or sewing the lower opening closed after finishing.
Round 1: Ch 1, sc into each chain around (36 sc). Join with a sl st to the first sc.
2. Build the Open Mesh Body
Round 2: Ch 1, sc in the first stitch, *ch 3, skip the next 2 stitches, sc in the next stitch; repeat from * around until 12 chain-3 arches are formed. Finish by chaining 3 and joining to the first sc with a sl st, as needed to complete the last arch. Check that you have 12 mesh openings.
Round 3: Sl st into the first ch-3 space. Ch 1, sc in the same space, *ch 3, sc in the next ch-3 space; repeat from * around. After the final sc, ch 3 and join to the first sc.
Repeat Round 3 until the mesh body measures approximately 10–11 in (25–28 cm), or reaches your preferred length. Each round should maintain 12 evenly spaced mesh openings.
3. Add the Top Band
Band Round 1: Work 3 sc into each of the 12 mesh spaces (36 sc total). Join.
Band Rounds 2–3: Ch 1, sc in each stitch around (36 sc). Join. Fasten off if you want to make the loops separately.
4. Crochet Two Hanging Loops
Lay the holder flat and mark two attachment positions about one-quarter of the circumference apart on either side of the top band. For each loop, join yarn to one marked stitch, ch 30–40 according to the desired hanging length, and sl st securely into its matching attachment stitch a few stitches away along the band. Work sc back along the chain to reinforce the loop, then fasten off. Repeat for the second loop, positioning both symmetrically. Reinforce the joining points with a yarn needle.
5. Add a Soft Scalloped Finish
For a decorative finish, work along the upper edge between the handle attachment points: *sl st in the next stitch, skip 1 stitch, work 5 dc in the next stitch, skip 1 stitch; repeat where space allows. Adjust the spacing near the straps rather than forcing a shell into a narrow gap. This edging is optional; a plain top band works just as well.
6. Weave in Ends and Shape
Secure all ends carefully. Lightly dampen the holder and reshape by hand. Allow it to air-dry completely before hanging. Avoid stretching the loops while wet.
How to Customize Your Crochet Holder
- Neutral farmhouse style: Use soft ivory, oatmeal, or charcoal cotton yarn.
- Smaller organizer: Crochet fewer mesh rounds for a compact wall pocket.
- Longer organizer: Repeat the mesh round until your preferred length.
- Tighter mesh: Use shorter chain spaces and recalculate stitch placement; test a swatch first.
- More structure: Add a washable fabric liner sized to the finished holder.
Where to Use It
Hang your finished crochet organizer in a kitchen for clean reusable produce bags, near a laundry area for lightweight cloths, or in a craft room for soft yarn scraps. Use a stable hook and check the strap attachments regularly. This is decorative light-duty storage, not a load-bearing hanging bag.
Care Instructions
Follow the yarn label. For many cotton yarns, gentle washing in cool water and laying flat to dry helps preserve the shape. Avoid high heat and heavy loads, which can distort the open mesh.
Frequently Asked Questions
Is this crochet mesh bag holder suitable for beginners?
Yes, if you already know how to chain, single crochet, and double crochet. Practice a couple of mesh rounds before starting the full project.
Can I make this with acrylic yarn?
You can, but cotton often gives a firmer finish and suits a practical household organizer. Choose a washable yarn and follow its care label.
How do I change the size?
Add or remove mesh rounds for height. To change width, alter the foundation chain in multiples of three and adjust the 12-arch mesh repeat accordingly.
Is this the exact pattern shown in the reference photo?
No. It is an original pattern inspired by the photograph’s silhouette, mesh texture, and decorative hanging loops.
Final Thoughts
With its delicate openwork and gentle scalloped trim, this crochet hanging mesh bag holder brings useful storage and handmade warmth together. Try it in two contrasting neutral shades for a matching kitchen set, then make one in your favorite color as a gift.
Love practical crochet projects? Explore more DIY bags, accessories, and home décor inspiration on Crochet Cutie.
Leave a Reply