Snowdrift beanie: A Beautiful Textured Winter Hat Guide
The Snowdrift beanie pairs pronounced crochet ridges with a classic winter-hat silhouette. Designed by Thoresby Cottage, this textured hat is worked flat, finished with a ribbed brim, and can be personalized with colorful surface embroidery. This guide explains the materials, construction, sizing considerations, and techniques before directing you to the designer’s original instructions.
- What Makes the Snowdrift Beanie Special
- Materials and Tools
- Stitches and Techniques to Know
- How the Snowdrift Beanie Is Constructed
- Sizing, Fit, and Gauge
- Choosing Colors and Adding Embroidery
- Finishing and Care
- Where to Find the Original Snowdrift Beanie Pattern
- More Winter Crochet Inspiration
- Frequently Asked Questions
- Is the Snowdrift beanie suitable for newer crocheters?
- Does the Snowdrift beanie use US crochet terms?
- Can I adjust the Snowdrift beanie for a larger head?
- Is the embroidery essential to the hat?
- Conclusion
What Makes the Snowdrift Beanie Special
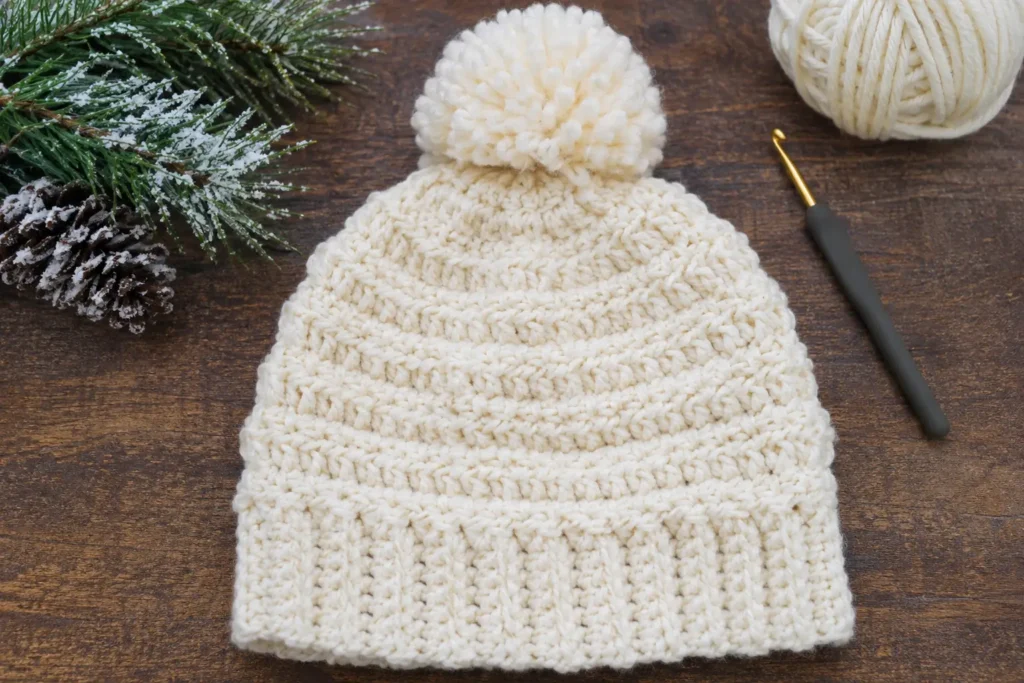
The defining detail is a firm series of raised horizontal ridges, created using stitches worked into the third loop. These ridges give a single-color hat plenty of visual interest. The original design has a balanced fit, neither tightly fitted nor dramatically slouchy, and the optional embroidered accents can highlight the spaces between the ridges.
Unlike a hat built in continuous rounds, the Snowdrift body and brim are crocheted as a flat piece. The piece is later shaped into a tube and the crown is drawn closed. That construction makes it easier to check the fabric’s length before the hat is assembled.
Materials and Tools
The designer specifies the following supplies for the Snowdrift crochet beanie. Refer to the original pattern for any project details not listed here.
- Worsted-weight yarn in a chosen solid color
- A 5 mm crochet hook
- A sewing needle for joining and finishing
- A pom-pom for the crown
- Embroidery yarn or thread, if you want decorative details
The reference does not specify a yarn brand, fiber blend, or exact skein quantity, so check your yarn label and plan your purchase according to the desired hat size. A smooth solid shade is particularly useful when you want the raised stitch pattern to remain visible.
Stitches and Techniques to Know
The original designer uses US crochet terminology. It is helpful to recognize these abbreviations before starting:
- ch: chain
- sc: single crochet
- hdc: half double crochet
- dc: double crochet
- FPdc: front post double crochet
- BPdc: back post double crochet
- RS / WS: right side / wrong side
- Third loop: an additional loop on a half double crochet stitch that can be worked into to emphasize raised texture
The body relies on half double crochet and third-loop single crochet for its ridges; the brim uses front and back post double crochet to create ribbing. If you enjoy texture-based crochet, our guide to working in the back loop only explores a different way to create raised lines in crochet fabric.
How the Snowdrift Beanie Is Constructed
The Snowdrift beanie begins as a back-and-forth crochet fabric, not a circle. Repeating the body’s textured rows builds a panel to the circumference needed. The brim is then added along a long edge using post stitches. After any optional embroidery, the long sides are seamed and the upper opening is gathered closed. The pom-pom is attached at the top.
The precise turning chains, third-loop placement, row repeats, and finishing sequence belong to the designer’s instructions. Follow the original Snowdrift beanie crochet pattern so those details remain accurate.
Sizing, Fit, and Gauge
The source includes a child-size set of instructions and a general reference sizing chart for ages from newborn to adult. Its sample child hat is worked until the flat panel measures approximately 50 cm (20 inches) along the direction that wraps around the head. The designer advises adjusting the number of rows for circumference and the starting-chain length for height.
Measure the intended wearer’s head instead of relying only on an age category. A stretchy hat usually needs a fit that is comfortable without squeezing or slipping. The designer does not give a numerical stitch gauge; fit is checked against the needed circumference and height. Because different yarns and stitch tensions can change the fabric, take time to compare your work with the target measurements.
Choosing Colors and Adding Embroidery
Solid cream, oatmeal, pine, charcoal, or a favorite bright winter shade can draw attention to the characteristic ridges. If you prefer an additional detail, the original Snowdrift design also shows small embroidery stitches arranged between those ridges. Several neighboring colors can produce a gentle gradient effect.
The embellishment is optional. Keep the embroidery relaxed rather than pulling the fabric inward, and place it before the seam is closed so the surface is easier to handle. The designer’s photos explain the placement more clearly than a verbal description alone.
Finishing and Care
Once the fabric and brim reach the intended size, the hat is closed into a tube and its top is gathered. The original pattern describes a seam that blends into the ridged surface. Secure the ends carefully and attach the pom-pom only after the crown is firmly closed.
Specific washing and blocking directions are not supplied in the reference. Follow the care label of the actual yarn you choose, and check whether any embroidery thread or removable pom-pom needs separate handling. If you block the hat, avoid stretching the ribbing beyond the intended fit.
Where to Find the Original Snowdrift Beanie Pattern
For the full child-size row instructions, stitch repeats, brim directions, embroidery photos, and finishing details, visit Thoresby Cottage’s original Snowdrift beanie pattern. The pattern belongs to its designer; this article provides an independently written guide rather than republishing the instructions.
More Winter Crochet Inspiration
For another wearable winter accessory, explore our twisted ribbed crochet ear warmer. You can also browse the chunky winter crochet headband ideas when you want a project that focuses on a different shape and yarn texture.
Frequently Asked Questions
Is the Snowdrift beanie suitable for newer crocheters?
Yes. The designer describes it as suitable for beginners. Familiarity with half double crochet, third-loop placement, and post stitches will make the original directions easier to follow.
Does the Snowdrift beanie use US crochet terms?
Yes. The pattern explicitly states that it uses US terms, including single crochet (sc) and half double crochet (hdc).
Can I adjust the Snowdrift beanie for a larger head?
Yes. The designer explains that extra body rows increase the circumference, while changes to the starting chain affect height. Compare the finished fabric with the intended wearer’s head measurements.
Is the embroidery essential to the hat?
No. The beanie’s textured crochet fabric stands on its own. Embroidery and the pom-pom are design details that can be adapted to your taste.
Conclusion
The Snowdrift beanie makes a useful case study in crochet texture: simple-looking ridges, a structured brim, and optional embroidery all contribute to a distinctive winter accessory. Choose a yarn that shows the stitches clearly, check the wearer’s measurements, and use the designer’s complete pattern for each technical step.
Leave a Reply