Crochet Patterns You’ll Love: 3 Adorable Halloween Ghosts
If you’re searching for charming Crochet Patterns to bring a handmade touch to your Halloween decorations, these miniature crochet ghosts are a lovely project to explore. With their rounded heads, gently flared bottoms, and tiny accessories, they offer a playful alternative to traditional spooky decorations.
Inspired by the free ghost designs from Katie Gets Creative, this project features three different ghost shapes, each with its own personality. You can keep them simple with little black eyes or dress them up with miniature witch hats and a delicate crochet bow.
One of the most interesting details is that these ghosts don’t require stuffing. Their crocheted fabric holds its shape, while carefully placed increases create the flowing appearance of a classic ghost.
The finished decorations measure approximately 2.75 to 3 inches tall, excluding accessories, making them suitable for small seasonal displays, shelves, and Halloween arrangements.
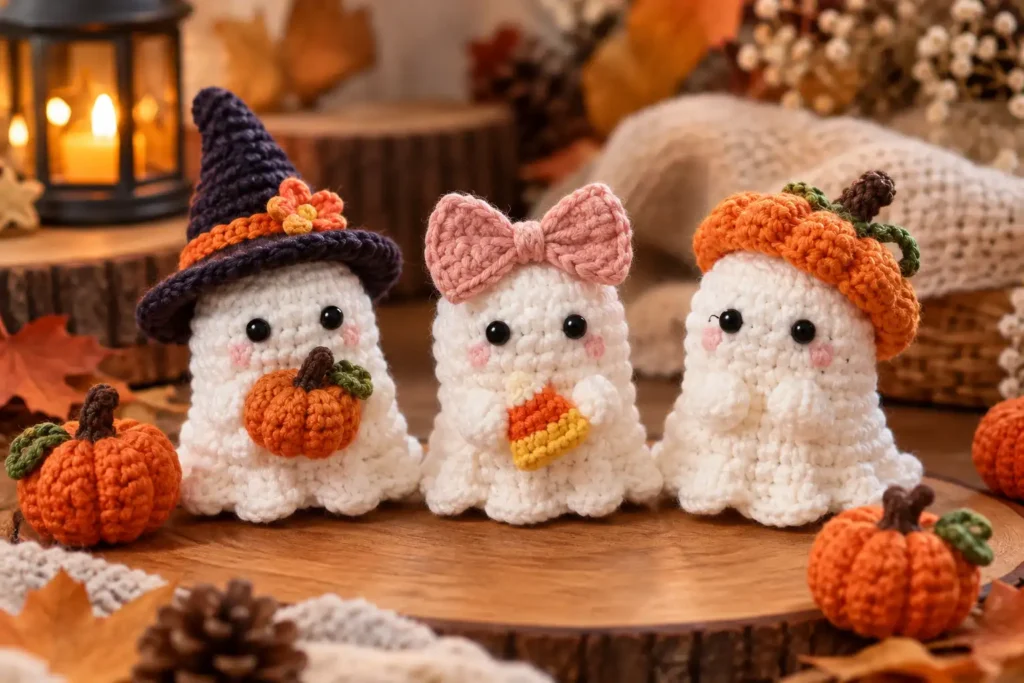
Table of Contents
Getting Started With These Ghost Crochet Patterns
Before beginning, gather your supplies and become familiar with the stitches used in the original designs.
These ghosts are worked in continuous spiral rounds, using basic crochet techniques and increases to create their distinctive shapes.
The designs are approachable for crocheters who already know how to make a magic ring, single crochet, and work increases. Some familiarity with crocheting in the round will make following the instructions easier.
Materials You’ll Need
The original project uses the following materials:
- Crochet hook: 4.0 mm
- Yarn: #4 medium worsted-weight yarn
- Safety eyes: 6 mm
- White or antique white yarn: For the ghost bodies
- Black or charcoal yarn: For the miniature witch hats
- Orange yarn: For the pumpkins
- Pink yarn: For the decorative bow
- Tapestry needle: For finishing and attaching accessories
- Scissors: For cutting yarn
- Polyester fiberfill: For stuffing the miniature pumpkins
The original designer used yarns from Hobby Lobby, including I Love This Yarn, Yarn Bee Soft & Sleek, and Yarn ID.
The ghost bodies themselves remain unstuffed, which is an important distinction between these decorations and traditional stuffed amigurumi figures.
Crochet Stitches and Abbreviations
The original instructions use the following stitch abbreviations, presented here with US crochet terminology:
| Abbreviation | Meaning |
|---|---|
| SC | Single crochet |
| Inc | Increase, working two single crochets into one stitch |
| Tr | Treble crochet |
| Sl st | Slip stitch |
| SC in BLO | Single crochet in the back loop only |
| Ch | Chain |
The project also uses a magic ring to begin crocheting circular pieces.
An invisible fasten-off technique helps create a tidy edge that blends with the surrounding stitches. This is particularly useful because the bottoms of the ghosts remain visible.
Helpful Notes Before Crocheting
The original designer recommends a yarn-under, yarn-over method for single crochet stitches.
With this technique, you catch the working yarn from underneath when drawing up the first loop, then yarn over to complete the stitch. It can produce a tighter fabric, helping the finished ghost maintain its shape.
Both the ghosts and witch hats are crocheted in continuous spirals rather than joined rounds.
Because the rounds continue without a joining slip stitch, paying attention to the pattern’s round progression is important.
The original project does not provide a specific gauge measurement. Its reported finished heights are approximately 3 inches for the taller ghosts and 2.75 inches for the smallest design, without accessories.
Ghost Crochet Pattern 1: The Short, Rounded Ghost
The first variation features a compact body with a softly widening lower section.
Its rounded upper portion gives it a friendly appearance, while the broader bottom creates the impression of a little floating sheet.
The shape begins with a magic ring and gradually expands through single crochet increases. After establishing the rounded top, additional increases help form the wider lower section.
Unlike a stuffed amigurumi figure, this ghost stays hollow.
The designer positions the safety eyes near the upper portion of the body, between the fourth and fifth rounds, with approximately two to three stitches separating them.
Once the crocheting is complete, the fabric is gently pinched around the increase areas to create the characteristic folds.
This shaping step is what transforms a simple crocheted form into a recognizable little ghost.
A miniature witch hat can be placed on top for an extra Halloween detail.
Ghost Crochet Pattern 2: A Sweet Ghost With a Pink Bow
The second ghost has a slightly different silhouette, with a longer, narrower body before the bottom begins to flare outward.
This variation is especially charming when finished with a small pink crochet bow.
Like the first design, it starts with a magic ring and uses single crochet stitches worked continuously in a spiral.
The upper portion develops into a rounded head, followed by a relatively straight body. Increases near the lower section create a wider edge that can be shaped into soft folds.
The original designer places the safety eyes between the fifth and sixth rounds, approximately two to three stitches apart.
After finishing the crochet body, the lower edge is shaped by gently pinching the fabric where the increases occur.
Adding the Pink Crochet Bow
The bow is a separate crocheted accessory made using a magic ring, chain stitches, and treble crochet stitches.
Its two rounded sides are gathered at the center to create the familiar bow shape.
The yarn tails serve two purposes: defining the center of the bow and providing a way to secure it to the ghost.
In the original design, the bow sits slightly off-center near the top of the head, giving the decoration an asymmetrical finish.
The designer attaches it using the yarn tails, although adhesive is also mentioned as an option.
Ghost Crochet Pattern 3: The Taller Floating Ghost
The third variation creates a taller ghost with a gently expanding lower section.
Its overall silhouette is more elongated than the first design, making it a useful companion when displaying all three ghosts together.
The body begins with a rounded top formed through increases in continuous rounds.
A longer section of single crochet maintains the main body shape before additional increases create the flared bottom.
As with the other variations, the ghost remains hollow and does not need polyester stuffing.
The eyes are positioned between the fifth and sixth rounds, with roughly two to three stitches between them.
After fastening off, the bottom is shaped by pinching the fabric around the increase areas.
This final adjustment gives the ghost its flowing appearance rather than leaving it as a simple crocheted cylinder.
The taller ghost can also wear one of the miniature witch hats described in the original project.
Crochet Accessories for Your Halloween Ghosts
The three ghost designs can be displayed individually, but the original project also includes small accessories that help create a coordinated Halloween scene.
These details introduce contrasting colors and textures without changing the basic ghost construction.
Mini Crochet Pumpkins
Tiny orange pumpkins make a natural companion to the white crochet ghosts.
The original designer uses a separate pumpkin pattern for these decorations, adapting the second pumpkin variation to create smaller sizes.
The smallest version begins with a chain of six, while the larger miniature version begins with a chain of nine.
The pumpkins are stuffed with polyester fiberfill, unlike the hollow ghost bodies.
Their warm orange color provides contrast when arranged beside the white ghosts and dark witch hats.
Miniature Crochet Witch Hats
The little witch hats add height and a recognizable Halloween element to the finished decorations.
They are crocheted separately using dark gray or charcoal-colored worsted-weight yarn.
Each hat begins with a small magic ring and gradually expands through a series of single crochet increases.
This construction produces a narrow, pointed crown.
A wider final section creates the miniature brim, giving the accessory its witch-hat silhouette.
Like the ghost bodies, the hats are worked in continuous spirals.
In the original display, the designer simply rests the hats on top of the ghosts rather than permanently attaching them.
However, sewing or gluing them in place is also suggested for anyone who prefers a fixed arrangement.
Finishing and Shaping Your Crochet Ghosts
The final shaping is particularly important for this project because the ghost bodies contain no stuffing.
Instead of relying on fiberfill to create volume, the designs use the structure of the crocheted stitches and the placement of increases.
After completing each ghost, the designer recommends pinching the lower areas where the increases occur.
This produces gentle creases that resemble folds in draped fabric.
A neat fasten-off also helps keep the lower edge looking finished.
The eyes and accessories provide the remaining character, allowing each variation to look slightly different despite sharing the same basic construction method.
These miniature ghosts are intended as decorations rather than toys, as the original designer specifically notes. The small safety eyes and accessories make them unsuitable for young children who may put small parts in their mouths.
Whether arranged as a trio or placed alongside the matching pumpkins, the finished pieces offer a compact way to bring crochet into seasonal decorating.
Conclusion
These adorable ghost Crochet Patterns are a delightful way to add handmade charm to your Halloween decorations. With three different ghost designs, miniature witch hats, a sweet crochet bow, and tiny pumpkins, the project offers plenty of opportunities to create a coordinated seasonal display.
The hollow construction makes these ghosts different from traditional stuffed amigurumi, while their simple shapes and carefully placed increases give each one a playful personality. Whether you prefer a classic ghost wearing a witch hat or a softer design decorated with a bow, each variation brings something special to the collection.
Frequently Asked Questions About Ghost Crochet Patterns
1. Are these ghost crochet patterns suitable for beginners?
These patterns are approachable for crocheters who have some experience with basic stitches and working in continuous rounds. You’ll need to understand techniques such as making a magic ring, single crochet, and increasing stitches. Beginners who are comfortable with these skills should find the construction manageable.
2. Do I need stuffing to make these crochet ghosts?
No, the ghost bodies are designed to remain hollow. Their crocheted structure and strategically placed increases help create their shape. However, the miniature crochet pumpkins included as decorative accessories do require polyester fiberfill.
3. Can I make the ghosts without witch hats or bows?
Yes! The ghosts look charming on their own, with their simple white bodies and small black eyes. The witch hats and bow are optional accessories that add variety to the finished decorations. You can make all three ghosts without accessories or combine different decorative elements to create your preferred Halloween arrangement.
4. How do I make the bottoms of my crochet ghosts look wavy?
The original designs use increases near the lower sections to create extra width. After finishing the crocheting, gently pinch the fabric around these increase areas to form soft folds. This simple shaping technique gives the ghosts their flowing appearance without requiring stuffing.
Leave a Reply