
Granny Square Blanket: A Charming Pumpkin Patch Crochet Project
A Granny Square Blanket decorated with charming pumpkin motifs is a wonderful way to bring autumn colors into your home. Combining warm orange pumpkins, delicate green stems, and soft cream backgrounds, this crochet project transforms traditional granny squares into a seasonal patchwork blanket.
The Pumpkin Patch Granny Square Blanket features individual crochet squares that come together to create a coordinated design. Its modular construction makes it easy to work on a few motifs at a time, experiment with different arrangements, and gradually build a blanket that suits your space.
Whether you want a decorative throw for your sofa, a cozy addition to your reading corner, or a handmade autumn gift, this design offers plenty of creative possibilities.
The project is particularly suitable for confident beginners who already understand basic crochet stitches, working in rounds, changing yarn colors, and joining squares.
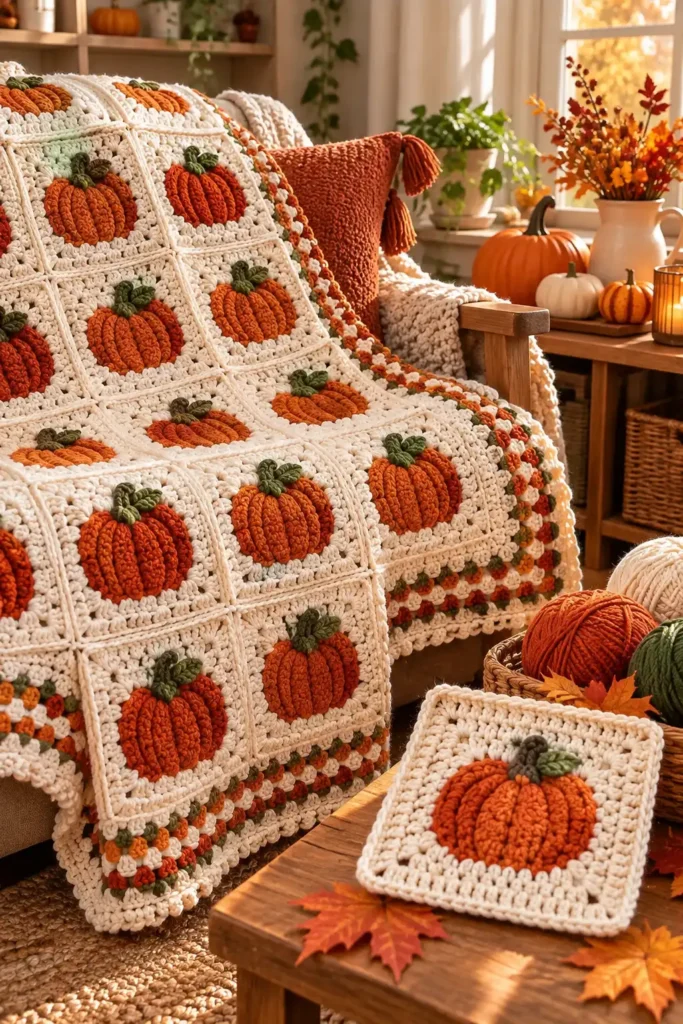
Table of Contents
What Makes This Pumpkin Granny Square Blanket Special?
The appeal of this blanket comes from its combination of familiar granny square construction and playful seasonal details.
Each pumpkin motif features a rounded orange center with textured shaping that suggests the natural ridges of a pumpkin. A small green detail represents the stem, while the surrounding cream stitches transform the motif into a square.
Once assembled, the individual blocks create a repeating pumpkin patch effect.
Several features make this project enjoyable:
- Portable construction: Work on individual squares without carrying an entire blanket.
- Flexible layout: Arrange pumpkin motifs together or alternate them with plain cream squares.
- Seasonal colors: Orange, green, and cream create a recognizable autumn palette.
- Skill development: Practice color transitions, motif shaping, blocking, and joining techniques.
- Customizable dimensions: Adjust the number of squares to create a blanket suitable for your intended space.
The neutral background is especially useful because it gives the pumpkin shapes enough contrast to remain visible without making the overall design feel too busy.
Materials Needed for the Granny Square Blanket
The reference tutorial suggests the following supplies for creating the pumpkin patch design.
| Material | Purpose |
|---|---|
| Cream-colored yarn | Square backgrounds, joining, and outer border |
| Burnt-orange yarn | Pumpkin motifs |
| Olive-green or forest-green yarn | Pumpkin stems and small decorative details |
| Crochet hook | Choose a size appropriate for the selected yarn |
| Yarn needle | Weaving in ends and finishing |
| Scissors | Cutting yarn |
| Stitch markers | Tracking stitches and corners |
| Blocking mats | Shaping completed squares |
| Rust-resistant pins | Holding motifs in place during blocking |
Choosing Suitable Yarn
The project can be made with soft anti-pilling acrylic, a wool blend, or a washable cotton blend.
Whichever fiber you choose, try to keep the yarn thickness and fiber characteristics consistent across all colors. This helps the completed squares maintain similar dimensions and respond evenly to washing and blocking.
The reference does not specify an exact yarn weight, hook size, yarn quantity, or finished blanket measurement. These details depend on the materials and dimensions selected for the project.
Before committing to the entire blanket, crochet a sample pumpkin square and measure it after washing and drying according to the yarn-care instructions.
Planning Your Pumpkin Patch Blanket Layout
One of the advantages of a granny square blanket is the freedom to decide how the finished design will look before joining the pieces.
You can create a blanket made entirely from pumpkin squares or introduce plain cream squares between the motifs.
Arranging the Squares
A repeating arrangement of pumpkin squares creates a colorful patchwork with a strong autumn theme.
Alternatively, placing plain cream blocks between the pumpkins produces a more spacious design and reduces the number of multicolored motifs required.
To plan your arrangement, place completed squares on a clean floor or sketch a grid on paper.
Pay attention to the spacing of orange motifs and the direction of the green stems. A balanced arrangement helps the blanket look intentional once assembled.
Estimating the Finished Size
The number of squares needed depends on the dimensions of each blocked motif and the size of blanket you want to make.
A useful planning method is to multiply the width of one finished square by the number of columns, then multiply its height by the number of rows.
Remember that joining techniques and the final border can affect the overall measurements.
Making a few additional squares can also be helpful if you need to replace a motif that differs noticeably in size or tension.
Understanding the Pumpkin Granny Square Construction
The pumpkin design begins with an orange circular center.
As the motif develops, textured stitch groups or increases form the rounded pumpkin shape and its characteristic ridges.
The orange section is then surrounded by cream stitches that establish the square outline. A small green element completes the pumpkin appearance.
The precise placement of stitches, shaping increases, and color changes is demonstrated in the original video rather than fully specified in the accompanying article.
Managing the Color Transitions
Changing colors neatly is important because the pumpkin shapes stand out against a light background.
A common technique is to introduce the new yarn color during the final pull-through of the preceding stitch. This produces a more controlled transition between the orange pumpkin and the cream background.
Leave sufficient yarn tails for secure weaving and avoid tightening the stitches excessively around color changes.
If the center begins to curl upward, check the stitch count and tension. If it becomes wavy, look for unintended increases.
Project Overview: From Individual Squares to a Finished Blanket
The construction process can be organized into several manageable stages.
- Select your colors. Prepare cream, orange, and green yarns of compatible thickness.
- Crochet a sample motif. Use the original video to make a complete pumpkin square.
- Check the dimensions. Block and measure the sample before deciding how many squares to make.
- Complete the motifs. Work the required number of pumpkin squares, keeping the shaping and color placement consistent.
- Add plain squares if desired. Make sure they match the pumpkin squares in size and edge structure.
- Secure loose ends. Weave in yarn tails before assembling the blanket.
- Block the squares. Shape the motifs to consistent dimensions and allow them to dry.
- Arrange the layout. Position all squares and check the direction of the pumpkins.
- Join the pieces. Assemble the motifs into rows and connect the rows.
- Finish the outer edge. Add the border, secure remaining ends, and follow the yarn’s washing instructions.
This overview explains the construction sequence without replacing the designer’s detailed stitch instructions.
Tips for Keeping Granny Squares Consistent
Consistency makes a noticeable difference when working with a large collection of crochet motifs.
Even small variations in tension can become more obvious once the squares are joined together.
Maintain Even Tension
Use the same hook and yarn range throughout the project whenever possible.
Compare new squares against your original sample regularly instead of waiting until every motif is finished.
If your tension changes during the project, checking the dimensions early can prevent assembly problems later.
Pay Attention to Corners
Corners play an important role in creating a balanced square shape.
A missed stitch can cause one side to pull inward, while unintended extra stitches or chains may produce uneven edges.
Stitch markers can help you identify important positions as you work.
Follow the video’s directions for turning the work, since changing the direction of a round may affect the motif’s surface texture.
Keeping Color Changes and Yarn Ends Neat
Pumpkin motifs involve several colors, so yarn management becomes part of the finishing process.
Preparing small balls of orange and green yarn can make individual squares easier to transport and work on.
When introducing another color, leave enough yarn to secure the end properly.
Weave loose tails through several stitches and reverse direction to help prevent them from working free during use.
Avoid relying on exposed knots in areas that may experience frequent handling.
If the reverse side of the blanket will remain visible, take extra care to keep color transitions tidy.
The source also mentions that a fabric backing is an optional addition. Any backing should accommodate the natural flexibility and stretch of the crocheted fabric.
Joining the Pumpkin Granny Squares
Joining is the stage where the separate pumpkin motifs become a complete blanket.
Before beginning, place the blocked squares in their intended arrangement with their right sides facing the same direction.
Taking a photograph of the layout can help you remember the order while assembling the pieces.
Choosing a Joining Method
Different joining techniques can change the appearance and texture of the finished blanket.
| Joining technique | Visual effect |
|---|---|
| Slip-stitch join | Creates a defined seam |
| Single-crochet join | Adds a raised, textured connection |
| Mattress-style seam | Produces a flatter, less visible join |
The source suggests cream yarn for a unified appearance across the blanket.
Whichever method you choose, avoid pulling the joining stitches too tightly. Excessive tension can shorten the seams and distort the finished patchwork.
The original tutorial should be consulted for the designer’s demonstrated joining method.
Adding a Smooth Crochet Border
A border provides the finishing frame around the pumpkin patch design.
It also helps organize the outer edges of the joined squares into a continuous outline.
Begin by distributing stitches evenly along the blanket edges, paying particular attention to the areas where squares meet.
Corners require consistent shaping so the border can turn without pulling or gathering.
After working a border round, spread the blanket on a flat surface and inspect the edges.
If the border draws inward, the stitch distribution may need adjustment. If it develops ruffles, there may be too many stitches along the edge.
The reference recommends checking the border as it develops rather than waiting until all finishing rounds are complete.
Autumn Color Variations and Creative Uses
Although orange pumpkins and cream backgrounds define the original design, the motif can be adapted to different decorating styles.
Rustic Harvest Colors
Combine rust-orange pumpkins with oatmeal backgrounds and moss-green stems for a muted autumn appearance.
This palette works particularly well when you prefer earthy tones over bright seasonal colors.
Soft Farmhouse Palette
Ivory, terracotta, and muted sage offer a softer interpretation of the pumpkin patch theme.
These shades allow the design to blend into neutral home décor while retaining its autumn character.
Halloween-Inspired Version
For a more dramatic seasonal look, consider darker backgrounds or occasional pumpkin faces.
Black and orange combinations can create a stronger Halloween theme, while the original cream background offers a gentler effect.
Smaller Projects Using the Motif
The pumpkin square concept can also inspire coordinating crochet accessories.
A single motif could become a decorative coaster, several squares could form a pillow front, and a narrow arrangement could be adapted into a table runner.
Keeping the same background or border color across these pieces helps create a coordinated collection.
Frequently Asked Questions
Is the Pumpkin Granny Square Blanket Beginner-Friendly?
The reference describes the project as appropriate for a confident beginner.
It is helpful to understand basic crochet stitches, working in rounds, changing yarn colors, and joining separate motifs.
The video provides additional visual guidance for shaping the pumpkin and transitioning from a circular center to a square.
How Much Yarn Do I Need?
The required yarn quantity depends on the selected yarn, hook size, motif dimensions, number of squares, and border.
The reference does not provide a fixed quantity.
To estimate your needs, weigh a completed square and multiply that amount by the planned number of motifs. Allow additional yarn for joining, the border, samples, and possible differences in tension.
Should I Block the Squares Before Joining Them?
Yes. Blocking helps bring individual motifs to consistent dimensions and makes their corners easier to align.
This can improve the assembly process and help the finished blanket lie more evenly.
Use a blocking method suitable for your chosen yarn fiber.
Can I Mix Different Yarn Brands?
Different brands may be used, but their yarn thickness, fiber composition, stretch, and care instructions should be compatible.
Yarns that behave differently during washing or blocking may cause uneven squares or distort the assembled blanket.
Testing a sample before beginning the full project is a practical precaution.
A Cozy Autumn Crochet Project Worth Making
The Pumpkin Patch Granny Square Blanket combines seasonal charm with the flexibility of traditional motif crochet.
From the rounded orange pumpkins to the soft cream squares and coordinated border, each part contributes to a cheerful autumn design.
Working one square at a time also makes the project manageable, whether you prefer short crochet sessions or longer periods of crafting.
With careful planning, consistent tension, and neat finishing, this Granny Square Blanket can become a decorative handmade piece to bring out whenever autumn arrives.
Conclusion
The Pumpkin Patch Granny Square Blanket is a delightful way to celebrate autumn through crochet. With its cheerful orange pumpkins, delicate green stems, and soft cream backgrounds, this project brings warmth and seasonal character to any living space.
Working with individual granny squares makes the blanket enjoyable to create at your own pace. Careful attention to consistent tension, neat joining, and finishing details will help you achieve a cohesive handmade result.
Whether displayed on a sofa, draped over a favorite chair, or given as a thoughtful seasonal gift, this Granny Square Blanket offers a charming combination of traditional crochet and autumn-inspired design.
Frequently Asked Questions
1. Can I Make the Granny Square Blanket in Different Sizes?
Yes! The modular construction allows you to adjust the finished blanket size by adding or removing granny squares. Before joining, arrange your completed motifs to determine the desired dimensions. Remember to account for the joining seams and outer border when planning the final size.
2. How Can I Keep the Pumpkin Motifs Looking Uniform?
Use consistent yarn thickness, hook size, and crochet tension throughout the project. Compare each completed motif with your original sample to identify differences in size or shaping. Blocking the squares before assembly can also help align their edges and corners.
3. What Is the Best Way to Join the Pumpkin Granny Squares?
The best method depends on your preferred appearance. A slip-stitch join creates a defined seam, while a mattress-style seam offers a flatter finish. Single crochet can add a decorative raised texture. Whichever method you choose, maintain even tension and align the square corners carefully.
4. How Should I Care for My Finished Pumpkin Patch Blanket?
Follow the washing and drying instructions for your chosen yarn. When appropriate for the fiber, gentle washing and flat drying can help preserve the blanket’s shape. Avoid stretching the wet fabric, and store the blanket in a clean, dry place when it is not in use.
Leave a Reply