Mini Crochet Christmas Presents: Free Gift Box Ornament Pattern
Looking for tiny holiday decorations that are sweet, reusable, and fun to make? These mini crochet Christmas presents look just like little wrapped gifts, complete with contrasting ribbons, fluffy bows, and loops for hanging on the tree. Make one as a charming ornament or crochet a colorful set for a handmade garland.
Pattern at a glance: Skill level: confident beginner • Finished size: approximately 2–2.5 inches (5–6.5 cm) wide, depending on yarn and tension • Time: about 45–90 minutes per ornament • US crochet terms.
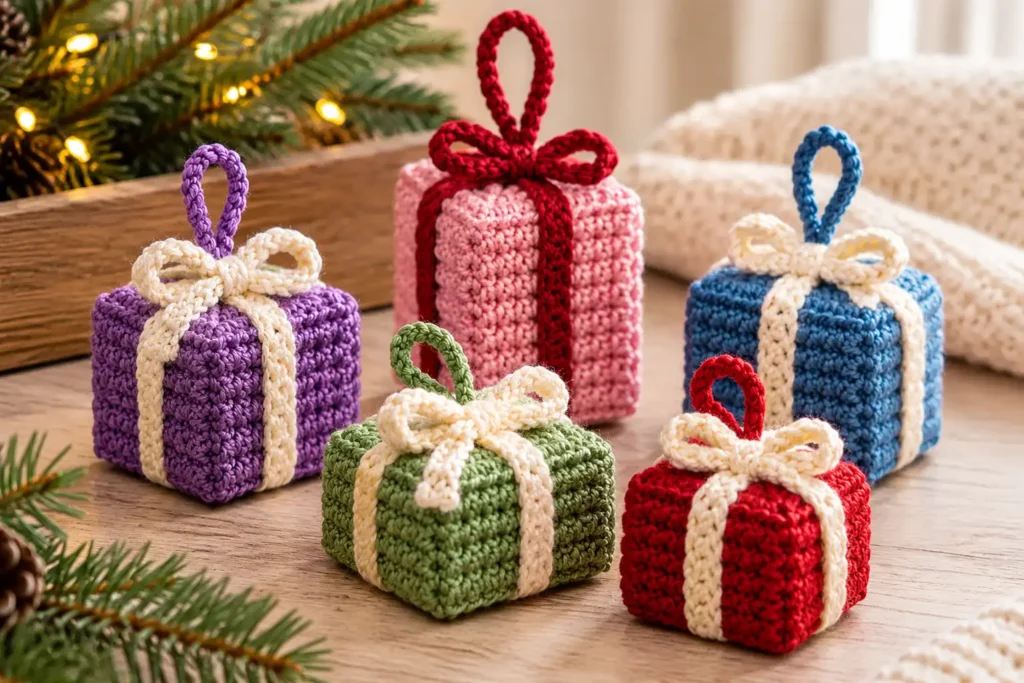
Table of Contents
Why You’ll Love These Mini Crochet Gift Boxes
- Great for scrap yarn in red, green, blue, lavender, pink, or cream.
- A versatile Christmas tree ornament, present topper, or festive garland decoration.
- A small, satisfying project that lets you practice single crochet and simple seaming.
- The ribbon and bow are crocheted separately, so you can mix and match colors.
Supplies You’ll Need
- Worsted-weight cotton or acrylic yarn in a gift-box color and a contrasting ribbon color.
- 3.5 mm (E/4) crochet hook, or a size that makes a firm fabric.
- Small amount of polyester fiberfill or yarn scraps for stuffing.
- Yarn needle, scissors, and a stitch marker.
- Optional: removable pins for positioning the ribbon and bow.
Gauge: Not critical. Use a tight enough fabric that stuffing won’t show through. For a smaller ornament, use lighter yarn and a correspondingly smaller hook.
Abbreviations (US Terms)
- ch = chain
- sc = single crochet
- sl st = slip stitch
- st(s) = stitch(es)
- inc = 2 single crochet stitches in one stitch
- dec = single crochet two stitches together
- FO = fasten off
Free Mini Crochet Christmas Present Pattern
This is an original, approachable construction inspired by the gift-shaped ornaments shown in the reference image. It is not a transcript of another maker’s pattern. Each box is made from six small square panels and finished with a separate cross-ribbon and bow.
Step 1: Crochet Six Square Panels
Make 6 in the main box color. Ch 11. Row 1: Sc into the second chain from the hook and in each chain across (10 sc). Rows 2–10: Ch 1, turn, sc in each stitch (10 sc). FO, leaving a long sewing tail on each panel. Adjust row count slightly if needed so each panel is roughly square.
Step 2: Assemble the Gift Box
Place four panels edge to edge to create the sides of a cube. Whipstitch or single crochet the side seams, then attach the bottom square. Add a little fiberfill or yarn scraps, keeping the shape gently squared rather than overstuffed. Sew on the top panel and weave in ends. For crisp corners, lightly shape the finished cube with your fingers.
Step 3: Make the Ribbon Strips
Make 2 long strips in the contrasting color. Ch 3. Row 1: Sc into the second chain and the next chain (2 sc). Ch 1, turn. Continue working 2 sc rows until the strip reaches over the top, down two opposite sides, and underneath your cube. FO with a long tail. Repeat for the second strip. Arrange the strips in a cross over the box, with their intersection centered on the top. Sew them securely in place, keeping them smooth along the edges.
Step 4: Crochet the Bow
Make 2 bow loops: Ch 13, sl st into the first chain to form a ring without twisting. Work 1 round of sc around the ring and FO. Pinch each loop in the center, place the two loops side by side, then wrap a short yarn strand around their centers to create a bow. Stitch the finished bow to the ribbon intersection on top. Add two short chain lengths as optional ribbon tails.
Step 5: Add a Hanging Loop
Join the ribbon-colored yarn at the top center behind the bow. Ch 18–22, then sl st into the same attachment spot to form a loop. FO and reinforce with the yarn needle. Tug gently to check that the loop is secure before hanging.
Make It Look Like the Photo
For the cozy holiday palette, make a lavender box with cream ribbon, a dusty blue box with ivory ribbon, a blush-pink box with deep burgundy ribbon, a sage-green box with soft cream ribbon, and a rich red box with ivory ribbon. Cluster several finished presents on a wooden shelf beside evergreen branches or display them on your Christmas tree.
Tips for Neat, Beautiful Crochet Presents
- Keep stitch tension consistent so all six panels match in size.
- Use a firm but flexible stuffing amount to avoid bulging sides.
- Pin both ribbon strips in place before sewing to make the cross symmetrical.
- Stitch the bow through the center of the ribbon cross for a secure finish.
- If gifting to young children, skip detachable decorations and check all stitching carefully.
Easy Variations
- Mini garland: Make several cubes and thread their hanging loops onto a long crochet chain.
- Gift topper: Leave the hanging loop long enough to tie around gift-wrap ribbon.
- Winter neutrals: Try oatmeal, cream, cocoa, pine green, and burgundy.
- Smaller version: Make each panel with 7 sc across and about 7 rows, checking for square proportions.
Frequently Asked Questions
Are these mini crochet Christmas presents beginner-friendly?
Yes. The panels use only chains and single crochet. The most important skills are counting rows, keeping square edges, and sewing the pieces together evenly.
Can I make crochet Christmas presents without stuffing?
Yes, but an unstuffed cube is softer and may collapse. For a structured ornament, use a small amount of filling.
What yarn works best for tiny crochet gift boxes?
Cotton holds crisp edges well, while acrylic often feels lighter and softer. Both work; choose a hook that produces a dense fabric.
How can I use these mini gift ornaments?
Hang them on a Christmas tree, add them to a wreath, turn them into garland, or tie them onto a wrapped present as a reusable decoration.
More Holiday Crochet Inspiration
If you love festive crochet projects, explore our handmade crochet Christmas baubles, granny square Christmas tree ornaments, and mini stocking Advent calendar.
Save this pattern for later! Pin your favorite color combination to a Christmas crochet board and share your finished tiny presents with other makers.
Leave a Reply