
Christmas Crochet Advent Calendar A Charming 24-Stocking Project
Make the countdown to Christmas more memorable with a handmade crochet Advent calendar featuring 24 miniature stockings. Each little stocking becomes a pocket for a sweet treat, a thoughtful message, or a small surprise, turning the days before Christmas into a cozy family tradition.
This project combines simple crochet techniques with festive colors to create a decoration that can be enjoyed every December. Rather than crocheting traditional socks with complicated shaping, the design uses flat pieces joined together to form small stocking-shaped pockets.
The finished calendar can hang on a wall, above a mantel, or from a decorative wooden branch. With numbered stockings from 1 to 24, it offers a creative alternative to disposable Advent calendars.
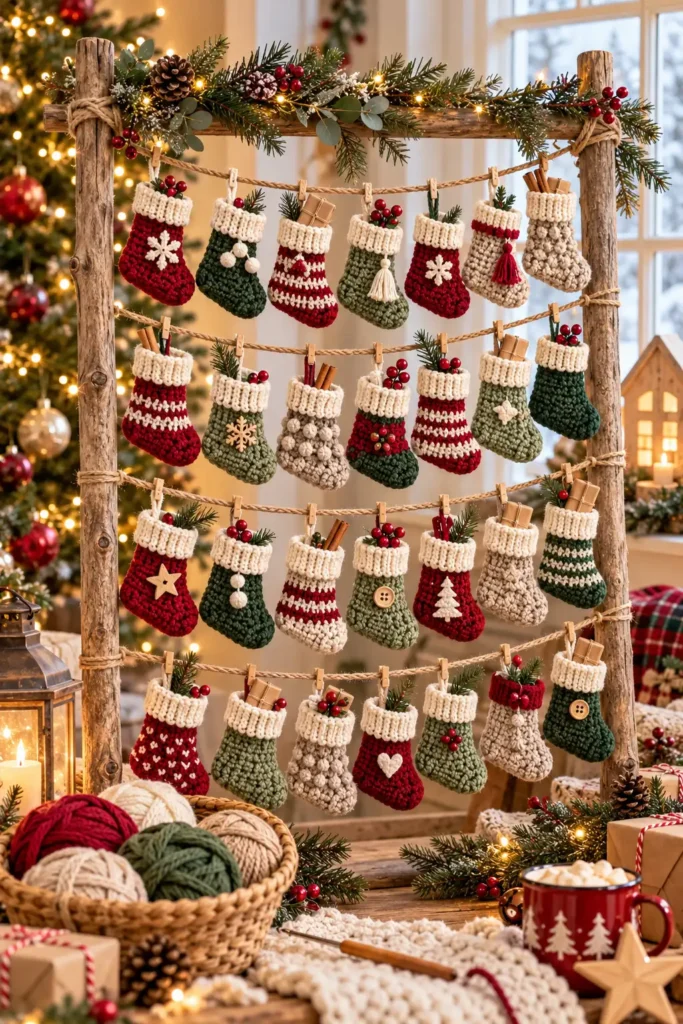
Table of Contents
Why Make a Crochet Stocking Advent Calendar?
A handmade Advent calendar brings together practical crochet, seasonal decorating, and the excitement of counting down to Christmas Eve.
The design is particularly appealing because the same stocking shape is repeated throughout the project. Once you become familiar with the construction, you can concentrate on choosing colors and adding personal details rather than learning new stitches for every piece.
Some of its main advantages include:
- Reusable design: Store the calendar after the holidays and bring it out the following year.
- Beginner-friendly construction: Each stocking is formed from two flat crochet panels.
- Customizable colors: Combine traditional reds and greens with softer neutral shades.
- Useful pockets: The stockings can hold lightweight candy, notes, or miniature gifts.
- Scrap-yarn potential: Small amounts of coordinating yarn can be incorporated into the collection.
- Flexible display: Arrange the stockings in rows, along a garland, or across a mantel.
Making 24 stockings also provides an opportunity to practice consistent stitches, maintain even tension, and improve finishing skills.
Skill Level and Techniques
Skill level: Beginner to Advanced Beginner
The original design is suitable for crocheters who already understand basic stitches and working in rows.
You should be comfortable with:
- Making a foundation chain
- Working single crochet stitches
- Turning at the end of rows
- Changing yarn colors
- Making slip stitches
- Joining crochet pieces
- Fastening off and weaving in ends
- Adding simple embroidery with a yarn needle
The project does not require traditional sock techniques such as turning a heel or working short rows.
Crochet Terminology
The source uses US crochet terminology.
The main abbreviations are:
| Abbreviation | Meaning |
|---|---|
| ch | Chain |
| sc | Single crochet |
| sl st | Slip stitch |
| st / sts | Stitch / stitches |
| BLO | Back loop only |
The stockings are worked primarily with single crochet, producing a fairly dense fabric suitable for small decorative pockets.
Materials for Your Christmas Crochet Calendar
The original design calls for Category 4 worsted-weight yarn and a 4.0 mm crochet hook.
For all 24 stockings, the source estimates approximately 1,000–1,200 yards of yarn, including the cuffs, decorative details, and hanging components.
Yarn Colors and Quantities
A coordinated holiday palette can include the following colors:
| Yarn color | Approximate yardage |
|---|---|
| Cranberry | 250–300 yards |
| Forest green | 250–300 yards |
| Oatmeal | 150–200 yards |
| Sage | 150–200 yards |
| Warm cream | 250–300 yards |
These are approximate planning quantities rather than exact yarn requirements. Actual usage will depend on individual tension, color distribution, and finishing choices.
Warm cream works particularly well for the stocking cuffs, hanging cords, and embroidered numbers.
Crochet Hook and Additional Supplies
You will need:
- 4.0 mm crochet hook
- Yarn needle
- Scissors
- Measuring tape
- Stitch markers
- Optional wooden dowel or decorative branch
- Small treats or folded notes for filling the stockings
The pattern does not require buttons or plastic fasteners.
Finished Stocking Measurements
Each miniature stocking is designed to be large enough for small surprises without becoming too heavy for a hanging display.
The reference gives these approximate finished measurements:
| Measurement | Finished size |
|---|---|
| Height | 5½–6 inches |
| Toe-to-heel width | 4–4½ inches |
| Upper opening | 3–3¼ inches |
Dimensions can vary slightly depending on yarn, hook tension, and finishing.
These pockets are better suited to lightweight items than bulky presents. Folded messages, wrapped sweets, and tiny accessories are more appropriate than heavy gifts.
Gauge
The stated gauge is approximately:
- 16 single crochet stitches = 4 inches
- 18 rows = 4 inches
Although exact gauge is less important for a decorative item than for fitted clothing, consistency matters when making 24 matching stockings.
Completing one sample stocking before producing the remaining pieces can help you check its size, shape, and opening.
How the Mini Christmas Stockings Are Constructed
The original stocking uses a straightforward flat-panel method. Each stocking begins with two matching pieces that are joined to form a small pocket.
For the complete Advent calendar, you will need 48 panels, consisting of one front and one back for each of the 24 stockings.
The construction includes a shaped body, contrasting cuff, decorative number, joining border, and hanging loop.
1. Creating the Stocking Body
Each piece begins as a flat section of single crochet.
The lower portion establishes the foot, while the narrower section continues upward to form the stocking leg. This creates an L-shaped outline without requiring a separately constructed heel.
Because the design uses rows instead of rounds, it is approachable for crocheters who have not previously made socks.
The front and back should match in size and orientation so they can be joined neatly.
2. Adding the Contrasting Cuff
A band of cream-colored yarn is worked at the upper edge of each panel.
The contrasting cuff visually separates the opening from the stocking body and gives all the stockings a consistent appearance, even when several body colors are used.
Keeping the cuff color the same throughout the collection is one way to make the finished calendar feel coordinated.
3. Decorating the Front with a Number
Every stocking needs a number corresponding to a day from December 1 through December 24.
The reference recommends adding the number before assembling the stocking. Working on a flat panel makes it easier to position the embroidery and keep the reverse side accessible.
A simple backstitch or surface running stitch can be used to form the digits.
The suggested placement is approximately 1–1½ inches below the cuff, centered on the stocking leg.
Single-digit numbers can measure around ¾–1 inch in height. For double-digit numbers, the digits should be narrow enough to fit comfortably across the available space.
Choose thread or yarn that contrasts clearly with the stocking color.
4. Joining the Front and Back
Once the two panels are complete, they are placed together and joined around the outer stocking shape.
The original method uses single crochet through both layers to create the joining border.
The upper cuff edge must remain open. This opening allows each stocking to function as a small pocket.
After joining, check that the seams are secure and that the opening is wide enough to insert and remove the intended treats.
5. Finishing the Hanging Loop
Each stocking has a loop attached near its upper back corner.
The loop provides an attachment point for the calendar’s hanging cords.
It should be securely fastened and strong enough to support the stocking with a lightweight item inside.
Once the loop is attached, weave in the remaining yarn ends neatly.
Repeat the same construction until all 24 stockings are complete.
Choosing a Christmas Color Scheme
Color selection can make a simple repeated pattern look wonderfully varied.
The source offers several arrangements, from classic holiday shades to understated neutral combinations.
Traditional Red and Green
A familiar Christmas palette uses red, forest green, and white.
The reference suggests making 12 red stockings and 12 green stockings, finished with white cuffs.
This combination creates a recognizable holiday appearance and keeps the color planning simple.
Cranberry, Sage, and Oatmeal
For a softer, more muted Advent calendar, the source proposes:
- 8 cranberry stockings
- 8 forest-green stockings
- 4 oatmeal stockings
- 4 sage stockings
Cream cuffs bring the different shades together.
The combination offers enough variety to make individual stockings distinguishable without creating a crowded display.
Neutral Farmhouse Colors
A more understated palette can feature oatmeal, taupe, warm cream, sage, and muted cranberry.
These colors can complement wooden ornaments, natural greenery, and rustic seasonal decorations.
Scandinavian-Inspired Colors
The reference also suggests warm cream, brick red, oatmeal, and charcoal.
Minimal embellishments and consistent shapes allow the color contrast to become the main decorative feature.
Arranging the 24 Stockings for Display
After completing the stockings, the next stage is deciding how to hang them.
The original calendar uses four horizontal cords, each carrying six stockings.
This arrangement keeps the numbers visible and makes the display manageable on a wall.
Four Rows of Six Stockings
The source specifies approximately 32–38 inches for each of the four hanging cords, depending on the desired spacing.
Six stockings are attached along each cord, with approximately 4–5 inches between them.
The finished rows can then be positioned beneath one another.
A simple chronological arrangement is:
| Row | Stocking numbers |
|---|---|
| 1 | 1–6 |
| 2 | 7–12 |
| 3 | 13–18 |
| 4 | 19–24 |
Placing the numbers in order makes it easy to locate each day’s stocking.
Alternatively, you can distribute the numbers randomly, turning the daily countdown into a small searching activity.
Hanging the Calendar from a Wooden Dowel
The reference suggests using a wooden dowel approximately 30–36 inches long.
The four rows are suspended at different heights, with additional yarn strands used to support the arrangement if needed.
A dry decorative branch can be used instead for a more natural appearance.
Before securing everything permanently, check the spacing and ensure the display hangs evenly.
Other Display Options
The stocking collection does not have to follow a four-row layout.
The reference also describes alternatives such as a mantel garland, one continuous line of stockings, or a graduated arrangement resembling a Christmas tree.
A longer garland may be suitable for a staircase or railing, while a compact arrangement can work better in smaller spaces.
Whatever arrangement you choose, make sure the support is secure and the filled stockings are not too heavy.
What to Put Inside Your Crochet Advent Stockings
The real charm of an Advent calendar comes from the small surprises waiting inside.
The stockings can be filled with a mixture of edible treats, tiny gifts, and handwritten activities.
Sweet Christmas Treats
Possible fillings include individually wrapped chocolates, small candy canes, caramels, and miniature cookies.
Select items that fit comfortably through the opening and will not stain the yarn.
Wrapped treats are generally preferable to loose sweets.
Christmas Activity Notes
A folded note can turn an ordinary day into a shared seasonal moment.
Ideas from the reference include:
- Watching a Christmas movie
- Preparing hot chocolate
- Baking festive cookies
- Making gingerbread decorations
- Looking at neighborhood Christmas lights
- Creating paper snowflakes
- Reading a Christmas story
Activity notes are especially useful when you want the calendar to focus on experiences rather than daily purchases.
Kindness and Thoughtful Gestures
An Advent calendar can also encourage simple acts of kindness.
Small slips of paper might invite someone to write a thank-you note, help with a household task, compliment a friend, or donate a toy.
These activities allow each stocking to carry a meaningful message without requiring a physical gift.
Small Crochet and Craft Surprises
For someone who enjoys making things, a few stockings can contain craft-related items.
The source suggests stitch markers, yarn scraps, buttons, and other miniature supplies.
Any needles or sharp items should be safely packaged and kept away from young children.
Decorating Individual Christmas Stockings
Repeating the same stocking shape does not mean every piece has to look identical.
Small decorative changes can introduce variety while preserving the overall design.
Bows, Stars, and Snowflakes
Selected stockings can be embellished with miniature crochet bows, stars, or snowflakes.
Light-colored decorations stand out clearly against cranberry and forest-green yarn.
Using these details on only some stockings can create visual interest without covering every surface.
Contrasting Toes and Stripes
The reference includes color-blocked toes and striped variations.
These effects are created by changing yarn colors during the construction of selected panels.
Keeping the cuff color consistent helps tie the different designs together.
Alternative Cuff Finishes
The cuffs can also become a decorative feature.
The source mentions solid contrasting cuffs, striped versions, and ribbed-looking finishes worked through the back loop only.
A consistent cuff style produces a uniform collection, while alternating finishes gives individual stockings more character.
Making December 24 Special
The final stocking can have a different decorative treatment to distinguish Christmas Eve.
A small bow, snowflake, or decorative edging can help number 24 stand out.
The reference also discusses making the last stocking larger, although that requires altering the standard construction.
For a uniform set, decorating the final stocking is the simpler option.
Planning Your Crochet Project
Twenty-four miniature stockings represent a substantial amount of repeated crochet work, even when each individual piece is simple.
Organizing the project can help prevent unfinished panels and missing numbers.
Working in Batches
Instead of making each stocking completely before starting the next, you can group similar tasks together.
For example, crochet several panels in the same color before switching yarn.
The source recommends a production sequence that covers body panels, cuffs, numbers, joining, loops, hanging cords, and final assembly.
Working this way reduces the need to alternate constantly between crocheting, embroidery, and finishing.
Seven-Day Project Schedule
The reference outlines a seven-day plan in which four stockings are made on each of the first six days.
The final day is reserved for completing numbers, loops, cords, and assembly.
This is a suggested schedule rather than a guaranteed completion time. Beginners or crocheters with limited daily crafting time may need longer.
A slower approach of completing two or three stockings during each crafting session can make the project easier to fit around everyday activities.
Tracking Your Progress
A simple checklist can help you manage all 24 stockings.
For each number, record whether the front panel, back panel, embroidery, joining seam, and hanging loop are complete.
This makes it easier to identify any unfinished pieces before attaching them to the calendar.
Which Yarn Works Best?
The original pattern uses worsted-weight yarn, but the fiber content can affect the finished texture and structure.
Acrylic Yarn
Worsted-weight acrylic is available in many colors and is often budget-friendly for projects requiring numerous pieces.
It is also relatively lightweight, which can be useful for a hanging calendar.
Care requirements vary, so check the individual yarn label.
Cotton Yarn
Cotton can provide defined stitches and a structured appearance.
Its relatively low elasticity can be useful for pockets intended to hold small objects.
However, cotton yarn can feel heavier than some acrylic alternatives, so consider the weight of the completed display.
Wool Blends
Wool-blend yarns can provide texture and a softer, traditional handmade appearance.
The cost and care requirements depend on the blend.
For any yarn choice, maintaining similar thickness across all 24 stockings helps prevent noticeable size differences.
Using Leftover Yarn
A collection of miniature stockings offers opportunities to incorporate leftover yarn from other projects.
Red, burgundy, green, beige, cream, and sage can all work within a coordinated seasonal palette.
The important consideration is keeping yarn weights reasonably consistent and checking that the finished pieces match the desired size.
Adjusting the Stocking Size
The reference includes options for making the stockings smaller or larger.
For smaller stockings, it suggests DK-weight yarn and a 3.5 mm hook.
A smaller version may create a lighter display, although the finished dimensions will differ from the original.
Larger stockings require adjustments to the foundation and row proportions. Those changes are not provided here as a separate graded pattern.
Remember that increasing the size of every stocking will also increase the amount of yarn needed for the full calendar.
The standard design is primarily intended for candy, folded notes, and other small items. Full-size gift cards may fit tightly, depending on the finished opening.
Common Crochet Stocking Problems and Solutions
Even simple projects can develop small inconsistencies when the same item is repeated many times.
Stockings Have Uneven Dimensions
Differences in yarn thickness, hook size, or tension can cause variations between pieces.
Use consistent materials and compare new panels with your first completed sample.
The Toe Faces the Wrong Direction
Check the orientation of the front and back panels before joining them.
The pieces should align correctly so the stocking shape remains consistent.
Embroidered Numbers Look Uneven
Work the numbers before assembling the pockets.
Use the crochet rows as visual guides and check that the numbers sit at a consistent height below the cuff.
The Opening Is Too Narrow
Make sure the upper edge has not been joined accidentally.
The cuff should remain open so lightweight surprises can be inserted and removed without stretching the fabric excessively.
Hanging Loops Stretch or Tilt
Secure the hanging loop at the intended corner and keep the filling lightweight.
The original article also mentions reinforcing loops with slip stitches for added structure.
The Display Rows Look Crooked
Measure the placement of the hanging cords before permanently securing them.
Check the spacing between rows and ensure that the stockings hang freely without pulling the cords out of position.
Blocking, Cleaning, and Storing Your Calendar
A little finishing care can help the collection retain its appearance between Christmas seasons.
Blocking the Stockings
Light blocking may help even out minor differences between panels.
The source suggests blocking the flat pieces before joining or gently shaping completed stockings by hand.
Avoid excessively stretching the cuffs, as their openings need to remain functional.
Cleaning the Crochet Calendar
Remove all sweets, paper notes, detachable decorations, and other contents before washing.
Follow the care instructions for the yarn used.
After cleaning, reshape the stockings as needed and ensure they are completely dry before storing.
Storing After Christmas
When the holiday season ends, empty every pocket and lay the stockings flat.
Fold the hanging cords loosely and place the collection in a clean storage box.
Avoid tightly compressing any raised embroidery or decorative appliqués.
This will make it easier to bring the calendar out again the following December.
Frequently Asked Questions About Christmas Crochet Stockings
How many mini stockings do I need for an Advent calendar?
You need 24 stockings for a traditional countdown beginning on December 1 and ending on December 24.
Is this project suitable for beginners?
Yes. The original design is rated beginner to advanced beginner and relies primarily on single crochet worked in rows. Some familiarity with joining pieces, changing colors, and simple embroidery is helpful.
What hook size and yarn weight does the pattern use?
The reference specifies a 4.0 mm crochet hook with Category 4 worsted-weight yarn.
How much yarn is needed for all 24 stockings?
The source estimates approximately 1,000–1,200 yards, depending on tension, color choices, hanging cords, and embroidered details.
Are the mini stockings crocheted in rounds?
No. Each stocking is formed from two flat panels that are joined along the outer edges, leaving the upper opening accessible.
Can I use the stockings for gift cards?
The standard dimensions are intended for small treats and notes. A full-size gift card may be a tight fit, depending on the final pocket measurements.
Can I hang the stockings as one long garland?
Yes. The individual hanging loops make it possible to rearrange the stockings along a longer cord instead of using the four-row display.
Final Thoughts
A crochet stocking Advent calendar transforms a collection of simple handmade pieces into something that can become part of your family’s Christmas celebrations.
The project focuses on approachable construction, consistent sizing, and flexible decorating options. By repeating the same basic stocking and changing the colors or small embellishments, you can create a coordinated set without learning 24 different designs.
Whether you choose bright traditional colors or soft neutral shades, the finished calendar offers a place for small surprises and seasonal activities throughout December.
Leave a Reply