
Granny Square Crochet Pattern: Easy and Beautiful Beginner Guide
Learning a granny square crochet pattern is an excellent starting point for anyone interested in handmade blankets, colorful accessories, and decorative crochet projects. With a few basic stitches and a simple repeating structure, you can create a traditional square motif that becomes the foundation for many larger designs.
This beginner-friendly project uses three rounds of crochet to form a classic granny square with an open center, grouped stitches, and four clearly defined corners. The original pattern uses worsted-weight yarn and a 5.0 mm crochet hook to produce a square measuring approximately 4 inches (10 cm) across.
Whether you are practicing your first crochet stitches or looking for a versatile motif to use in future projects, understanding how a granny square is constructed will help you develop confidence with crocheting in rounds.
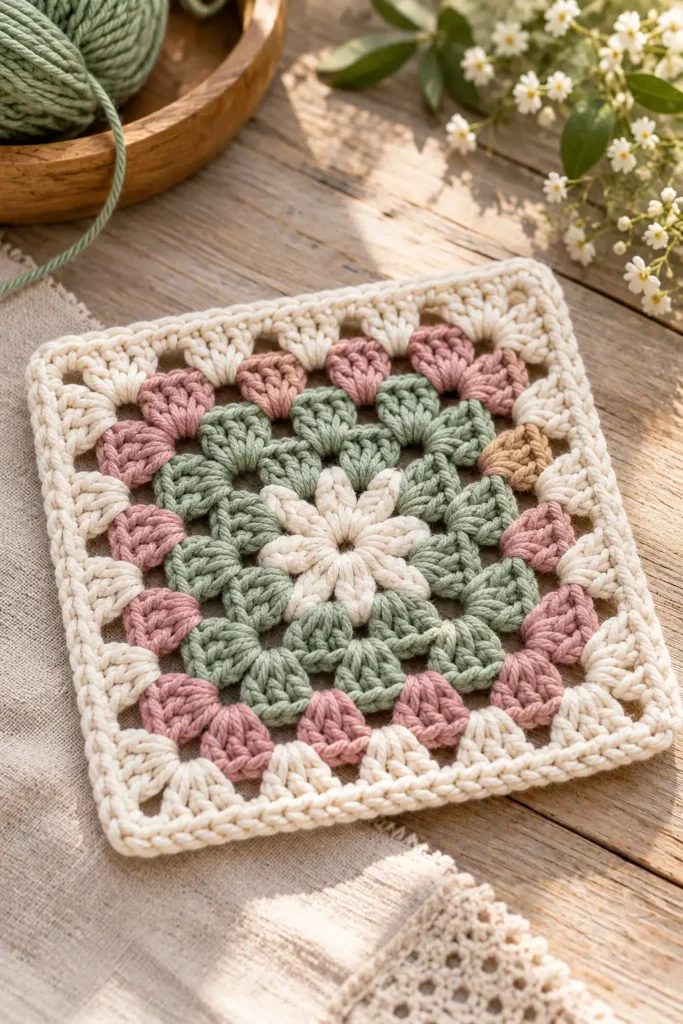
Table of Contents
What Is a Classic Granny Square?
A granny square is a flat crochet motif worked from the center outward. Unlike projects made in straight rows, granny squares grow through consecutive rounds, with additional stitch groups forming each side.
The traditional design relies primarily on two crochet stitches: chains and double crochet stitches.
Groups of three double crochet stitches, commonly called granny clusters, create the recognizable texture. Chain spaces separate these clusters and allow the fabric to expand as new rounds are added.
The corners are particularly important. Each corner contains two granny clusters separated by a chain space, giving the motif its square shape.
Once completed, individual squares can be joined to make blankets, garments, bags, and decorative home accessories.
Materials for This granny square crochet pattern
One advantage of this project is its short supply list. You only need yarn, a suitable crochet hook, and a few basic finishing tools.
Choosing Your Yarn
The reference pattern recommends worsted-weight yarn (weight 4) for beginners.
This medium-weight yarn makes the individual stitches relatively easy to identify and provides enough structure for practicing granny clusters and corner spaces.
The source suggests the following yarn options:
- Lion Brand Pound of Love
- Red Heart Super Saver
- Caron Simply Soft
You can work the square in one continuous color or introduce different shades between rounds.
Using contrasting colors can also make it easier to distinguish each completed round while learning.
Crochet Hook and Additional Supplies
| Material | Specification |
|---|---|
| Yarn | Worsted weight, category 4 |
| Crochet hook | 5.0 mm, US H-8 |
| Scissors | For cutting yarn |
| Tapestry needle | For weaving in loose ends |
The original project does not specify a required yarn quantity for an individual square.
Crochet Abbreviations and Stitch Terminology
The reference uses US crochet terminology, so the abbreviation dc refers to a US double crochet stitch.
| Abbreviation | Meaning |
|---|---|
| ch | Chain |
| dc | Double crochet |
| sl st | Slip stitch |
| sp | Space |
| rep | Repeat |
| rnd | Round |
Understanding Granny Clusters
A granny cluster is formed by working three double crochet stitches into the same designated space.
These clusters sit beside one another, separated by chain spaces.
As the square grows, additional clusters are introduced along its sides while the corner structure remains consistent.
Why Corner Spaces Matter
The corners provide the extra room needed for the motif to expand evenly in four directions.
The original pattern uses chain-2 spaces at the corners and chain-1 spaces between clusters along the sides.
Recognizing the difference between these spaces is essential for maintaining the correct shape.
Basic granny square crochet pattern: Project Overview
The original project is designed for beginners who want to learn the traditional three-round granny square.
| Project detail | Information |
|---|---|
| Skill level | Beginner |
| Construction | Worked in rounds |
| Number of rounds | 3 |
| Finished dimensions | Approximately 4 × 4 inches (10 × 10 cm) |
| Hook size | 5.0 mm |
| Yarn weight | Worsted, category 4 |
| Main stitches | Chain and double crochet |
The finished size is approximate and may vary depending on yarn characteristics and individual tension.
The source does not provide a separate stitch-gauge swatch.
How the Three-Round Granny Square Is Constructed
The traditional granny square begins with a small central ring. Each subsequent round builds outward, adding more clusters while maintaining four corners.
The following explanation describes the construction without replacing the complete written pattern.
Creating the Starting Ring
The reference begins with a short foundation chain joined into a ring using a slip stitch.
This creates the central opening where the first round of stitches is placed.
The opening should be large enough to accommodate the initial stitch groups without forcing the hook through tightly packed chains.
Round One: Establishing the Four Corners
The first round creates the foundation of the square.
Four granny clusters are arranged around the center, with chain spaces separating them.
Although the motif may initially look somewhat rounded, these spaces establish the four corners needed for the following rounds.
The beginning chain also serves as part of the first double crochet cluster.
Round Two: Building the Square Shape
The second round expands the motif by adding clusters into the corner spaces created during the first round.
Each corner receives two groups of double crochet stitches separated by a chain space.
Additional chains create spaces along the sides, preparing the square for the next round.
At this stage, the four-corner structure becomes more visible.
Round Three: Completing the Basic Motif
The third round continues the same corner construction while introducing additional clusters along the sides.
This creates a larger square with the characteristic openings and grouped stitches of traditional granny-square crochet.
After the round is joined and the yarn is secured, the basic motif is complete.
Making Larger Granny Squares
The reference explains that the motif can be extended beyond the initial three rounds.
Each additional round preserves the four corners and introduces more granny clusters along the growing sides.
This repeating construction makes the classic granny square adaptable to projects requiring larger motifs.
Finishing Your Crochet Square
Finishing helps the completed square look tidy and prepares it for joining with other motifs.
Weaving in Loose Ends
After fastening off, thread the remaining yarn tails through a tapestry needle.
Work the tails through nearby stitches on the back of the square, changing direction to help secure them.
Trim the excess yarn once the ends are firmly woven into the fabric.
When working with multiple colors, finishing the ends as you complete each motif can reduce the amount of sewing required later.
Blocking for a Neater Shape
Blocking can help correct uneven corners and improve the appearance of the finished square.
The original article recommends dampening the motif, gently removing excess water, and laying it flat.
The corners can then be pinned into a square shape and left to dry completely.
Blocking is particularly useful when preparing several motifs that need to align during assembly.
Color Combinations for Granny Squares
Changing colors between rounds is one of the simplest ways to personalize a traditional granny square.
The reference suggests several color combinations, each creating a different visual effect.
Traditional Color Palette
Red, white, and navy produce a bold combination suited to classic granny-square projects.
The contrasting shades make the individual rounds easy to distinguish.
Soft Contemporary Colors
Sage green, cream, and dusty rose create a more muted appearance.
These colors can work well in decorative crochet projects where a softer palette is preferred.
Warm Autumn Shades
Mustard, rust, and chocolate brown offer a coordinated combination of earthy tones.
The deeper colors emphasize the layered construction of the motif.
Single-Color Granny Squares
Working every round in the same color creates a more uniform square.
Cream and white are among the monochromatic options mentioned in the source.
Multicolored Scrap-Yarn Squares
Using leftover yarn in different colors allows each round to have its own appearance.
This approach can be useful for projects made from a collection of individual motifs.
Methods for Joining Granny Squares
Once several squares are completed, they can be connected to form larger pieces of fabric.
The original article introduces three common joining methods.
Slip Stitch Join
A slip stitch join connects two squares with crochet stitches worked through both layers.
Depending on the orientation of the squares, the seam can create a visible ridge that becomes part of the design.
Single Crochet Join
Single crochet joining produces a slightly raised seam.
This method creates a defined line between motifs and can emphasize a patchwork arrangement.
Whip Stitch Join
Whip stitching uses a tapestry needle and yarn to sew adjacent squares together.
The reference describes joining through the back loops to create a relatively flat seam.
This technique may appeal to crocheters who prefer sewing their completed motifs rather than joining them with a crochet hook.
Projects You Can Make With Granny Squares
The basic square can serve as a building block for many crochet projects.
Granny Square Blankets
A blanket is one of the most familiar uses for this motif.
Multiple squares are arranged into rows and columns, joined together, and finished with a border.
The total number of motifs depends on the intended blanket dimensions and the size of each square.
Granny Square Cardigans
Granny squares can be assembled into garment panels and sleeves.
The finished garment depends on the arrangement, shaping, and joining of the motifs.
Handmade Tote Bags
Several squares can be joined to create the main body of a bag.
The panels are assembled, the sides are secured, and handles are added to complete the accessory.
Decorative Pillow Covers
Granny squares can also be used to create crocheted pillow panels.
Smaller motifs may be joined together, while larger squares can form individual sections of a cover.
Baby Blankets
The reference includes baby blankets among the possible uses for the basic motif.
For this type of project, yarn softness, washability, and the intended blanket dimensions are important considerations.
Other Granny Square Designs to Explore
After learning the traditional motif, crocheters can explore other granny-square variations.
Sunflower Granny Squares
These designs introduce flower-inspired shapes and textured details around the center.
Heart Granny Squares
Heart motifs incorporate a recognizable heart shape into the square design.
Solid Granny Squares
Solid squares have fewer openings than traditional granny squares, creating a denser fabric.
Bobble Granny Squares
Bobble stitches introduce raised texture and additional dimension.
Mini Granny Squares
Smaller motifs can be used for decorative accents, appliqués, and accessories.
Each variation builds on crochet techniques that can be developed through practice with the basic square.
Beginner Tips for Better Granny Squares
Learning to make consistent granny squares takes practice, especially when working with chains and double crochet clusters for the first time.
Check Your Stitch Groups
At the end of each round, confirm that the expected clusters and corner spaces are present.
Identifying mistakes early is easier than correcting several completed rounds.
Keep Your Starting Ring Comfortable
A starting ring that is too tight can make the first round difficult to work.
Leave enough space for the hook and yarn to pass through without excessive pulling.
Practice With Contrasting Colors
Changing yarn colors between rounds makes the construction easier to follow visually.
This can help beginners recognize where each round begins and ends.
Work Several Practice Squares
Repeating the same motif helps develop more consistent tension and stitch placement.
Making a small collection of squares also provides an opportunity to compare their shapes and dimensions.
Secure Ends Regularly
Weaving in loose ends as you finish each square keeps the project organized, particularly when working with several yarn colors.
Common Granny Square Problems and Solutions
Even a simple crochet motif can present challenges while learning.
Why Is My Granny Square Curling Upward?
Curling can occur when the stitches are too tight or the fabric does not have enough room to lie flat.
The reference suggests relaxing your tension or trying a slightly larger hook.
Check that the corner spaces and stitch groups have been worked correctly before changing tools.
Why Are My Corners Rounded?
Rounded corners may result from using the wrong number of chains in the corner spaces.
The original design relies on chain-2 corner spaces to create its square shape.
Review the corner construction carefully if the edges appear unusually curved.
Why Is the Center Hole Too Large?
The size of the center opening depends partly on how the starting ring is formed.
The source recommends tightening the starting yarn tail to reduce the opening.
Avoid pulling so tightly that the surrounding stitches become distorted.
Why Are My Squares Different Sizes?
Inconsistent tension can produce motifs with slightly different dimensions.
Try maintaining the same yarn, hook, and stitch tension throughout the project.
Blocking the completed motifs may help even out minor differences before joining.
Frequently Asked Questions
What Is the Purpose of the Beginning Chain Three?
In the original pattern, the beginning chain-three counts as the first double crochet stitch.
It provides the height needed to begin the round and forms part of the initial granny cluster.
Can I Use a Magic Ring Instead of a Chain Ring?
Yes. The reference identifies a magic ring as an alternative starting method.
A magic ring can create an adjustable center opening, while a joined chain ring provides a traditional starting point.
What Crochet Hook Size Should Beginners Use?
The reference recommends a 5.0 mm (US H-8) hook with worsted-weight yarn.
The ideal hook size can vary depending on the yarn and your individual tension.
Can I Make a Granny Square Using Only One Color?
Yes. A traditional granny square can be worked entirely in one color.
Changing colors is optional and mainly affects the visual appearance of the motif.
How Long Does It Take to Crochet One Granny Square?
The source estimates that a beginner’s first square may take approximately 25 to 40 minutes.
The time required depends on experience, familiarity with the stitches, and individual working speed.
Can I Continue Adding Rounds?
Yes. The traditional granny-square structure allows additional rounds to be added.
The square grows outward as more clusters are worked along the sides while the corner structure is maintained.
Final Thoughts
The classic granny square crochet pattern is a useful foundation for learning how crochet motifs are constructed. Its combination of chain spaces, double crochet clusters, and repeated corner shaping introduces techniques that can be applied to many other projects.
Starting with a small three-round square allows beginners to concentrate on stitch placement, tension, and recognizing the structure of each round.
With practice, these individual motifs can become part of larger handmade pieces, from blankets and cushions to bags and garments.
Learning the basic granny square is not just about completing one small crochet project. It is about developing a versatile skill that opens the door to many creative possibilities.
Leave a Reply