Crochet Sweater: Beautiful Blueberry Dream Cropped Cardigan
If you’re looking for a crochet sweater that combines cozy texture, playful details, and a flattering cropped silhouette, the Blueberry Dream Cropped Cardigan is a lovely project to explore. With its soft lavender color, voluminous balloon sleeves, and tiny handmade blueberry decorations, this cardigan brings a fresh twist to everyday crochet clothing.
The design features a V-neck opening, ribbed edges, and a button-front closure. Small three-dimensional blueberries are scattered across the cardigan, adding texture and color without requiring complicated colorwork in the main garment.
Although the construction uses familiar crochet stitches, the shaping and decorative details make this an intermediate-level project. The cardigan is created from separate pieces that are joined together, making it easier to understand how each section contributes to the finished garment.
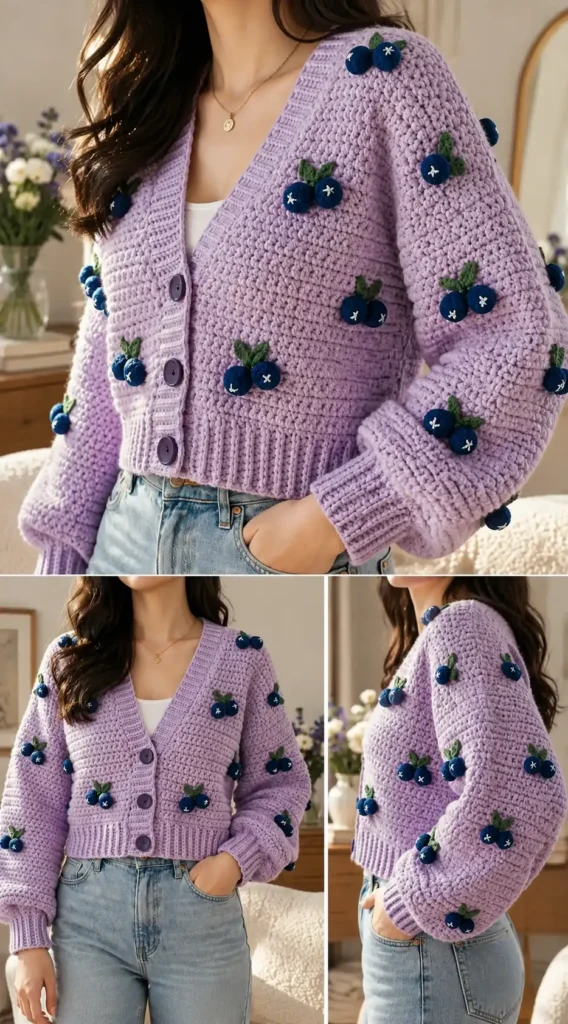
Table of Contents
What Makes This Crochet Sweater Special?
The Blueberry Dream Cardigan balances a simple garment structure with eye-catching decorative elements.
Its cropped body has a relaxed, slightly boxy shape, while the ribbed hem provides a neat finish. The V-neck creates an open neckline, and four buttons allow the cardigan to be worn closed or layered over another top.
The balloon sleeves are one of the most recognizable features. They begin with fitted ribbed cuffs, widen through the arm, and narrow again toward the shoulder. This shaping creates volume without leaving the wrists loose.
The blueberry decorations provide the finishing touch. Each cluster contains two or three small stuffed berries, green leaves, and delicate white embroidered details. Because the decorations are made separately, they can be attached after the cardigan is assembled.
Another practical advantage is the flat-panel construction. Rather than working the entire garment as one piece, you crochet the back, front panels, and sleeves individually before joining them with seams.
Skill Level and Estimated Crochet Time
The original pattern identifies this project as intermediate.
It is best suited to crocheters who already understand basic stitches and are comfortable following instructions for shaping and assembling garments.
Useful skills include:
- Working half double crochet in rows.
- Making increases and decreases.
- Creating ribbing through the back loops.
- Following V-neck and armhole shaping.
- Joining separate crochet panels.
- Working small amigurumi-style pieces in rounds.
- Sewing decorations securely onto fabric.
The main cardigan is estimated to take approximately 25–40 hours in size Medium, depending on the crocheter’s pace.
The decorative blueberry clusters may require an additional 6–8 hours.
These are estimates from the original designer rather than guaranteed completion times.
Materials Needed for the Blueberry Cardigan
Yarn and Colors
The cardigan uses bulky yarn for the main garment and medium-weight yarn for the blueberry decorations.
Main color: Lavender
- Yarn weight: #5 bulky (chunky).
- Used for the body, sleeves, cuffs, and front edging.
| Size | Approximate yarn requirement |
|---|---|
| XS | 900 yd / 823 m |
| S | 1,000 yd / 915 m |
| M | 1,100 yd / 1,006 m |
| L | 1,200 yd / 1,097 m |
| XL | 1,300 yd / 1,189 m |
| 2XL | 1,400 yd / 1,280 m |
Contrast color 1: Navy blue
- Yarn weight: #4 medium (worsted).
- Approximately 80 yards (73 meters).
- Used for the stuffed blueberries.
Contrast color 2: Green
- Yarn weight: #4 medium (worsted).
- Approximately 20 yards (18 meters).
- Used for the leaves.
The original designer recommends Paintbox Yarns Simply Chunky in Dusty Lavender and also mentions WeCrochet Brava Bulky as an option.
A yarn with a clearly visible stitch texture is particularly useful for this design because the raised blueberry clusters are intended to stand out against the cardigan fabric.
Crochet Hooks
Three hook sizes are specified for different parts of the project.
| Hook | Size | Purpose |
|---|---|---|
| A | 6.5 mm / US K | Main cardigan |
| B | 4.0 mm / US G | Blueberries |
| C | 3.5 mm / US E | Leaves |
Additional Supplies
- At least 10 stitch markers.
- Yarn needle for sewing and finishing.
- Scissors.
- Four buttons, approximately 1 inch (25 mm) in diameter.
- Polyester fiberfill for stuffing the berries.
- White embroidery floss.
- Embroidery needle.
- Sewing needle and matching thread for attaching buttons.
The original design suggests buttons in lavender-gray or muted purple to coordinate with the cardigan.
Crochet Gauge and Why It Matters
The specified gauge is measured using the main lavender yarn and the 6.5 mm hook.
GAUGE AFTER BLOCKING
13 hdc × 9 rows
4 × 4 inches (10 × 10 cm)
Gauge determines how closely your crochet fabric matches the dimensions intended by the pattern.
For this project, the designer recommends preparing a swatch at least 20 stitches wide and 14 rows tall, then blocking it before measuring.
If your swatch contains more stitches than the specified gauge across the same width, try a larger hook. If it contains fewer stitches, try a smaller hook.
Checking gauge before starting the cardigan is especially important because the finished bust measurements and armhole shaping depend on consistent stitch dimensions.
Finished Crochet Sweater Measurements
The Blueberry Dream Cardigan pattern includes six sizes, from XS through 2XL.
| Size | Finished bust | Length |
|---|---|---|
| XS | 34 in / 86 cm | 15 in / 38 cm |
| S | 37 in / 94 cm | 15.5 in / 39 cm |
| M | 40 in / 102 cm | 16 in / 41 cm |
| L | 43 in / 109 cm | 16.5 in / 42 cm |
| XL | 46 in / 117 cm | 17 in / 43 cm |
| 2XL | 49 in / 124 cm | 17.5 in / 44 cm |
The pattern includes approximately 4–6 inches of positive ease, giving the cardigan its relaxed fit.
The sleeve measurement from cuff to underarm is listed as 18 inches for every size.
When selecting a size, compare the finished bust measurement with your own body measurement while accounting for the amount of ease you prefer.
Crochet Abbreviations and Terminology
The original pattern uses US crochet terminology.
The following abbreviations appear in the instructions.
| Abbreviation | Meaning |
|---|---|
| ch | Chain |
| sl st | Slip stitch |
| hdc | Half double crochet |
| hdc2tog | Half double crochet two together |
| inc | Increase |
| dec | Decrease |
| BLO | Back loop only |
| st(s) | Stitch(es) |
| RS | Right side |
| WS | Wrong side |
| t-ch | Turning chain |
| MC | Main color |
| CC1 | Contrast color 1 |
| CC2 | Contrast color 2 |
| MR | Magic ring |
The half double crochet stitch forms the main fabric of the cardigan.
Back-loop-only stitches create the ribbed appearance along the hem and cuffs, while increases and decreases shape the neckline, armholes, and sleeves.
The decorative blueberries use small rounds of single crochet, a technique commonly found in amigurumi projects.
Important Pattern Notes Before Starting
The cardigan is made from five main pieces: one back panel, two front panels, and two sleeves.
These pieces are worked flat and joined using slip stitch seams.
The pattern also establishes several conventions that are important when following the original instructions.
First, turning chains count as stitches in the half double crochet sections. The designer uses a chain-two turning method and works into the previous row’s turning chain to maintain the correct stitch count.
Second, size-specific numbers are presented in the order XS, S, M, L, XL, and 2XL.
Finally, the blueberry clusters are separate decorative elements. They are attached after the main cardigan has been assembled and finished.
Keeping these details in mind helps prevent confusion when moving between garment sections.
How the Blueberry Dream Crochet Sweater Is Constructed
The project follows a traditional seamed-cardigan construction, with ribbed foundations, shaped panels, fitted sleeve caps, and decorative finishing.
The following overview explains the construction without replacing the designer’s detailed row-by-row instructions.
The back begins with a narrow ribbed strip worked in half double crochet through the back loops.
Once the ribbing reaches the required width for the selected size, the work is turned so stitches can be made along its long edge.
The main back section is then built upward in rows of half double crochet.
After reaching the specified body height, the upper edges are shaped to form the armholes. The remaining section continues toward the shoulders.
The back panel establishes the cardigan’s overall width and provides a reference for matching the two front pieces.
2. Working the Right Front Panel
The right front starts with ribbing similar to the back panel, but its foundation is narrower.
The main fabric is worked upward in half double crochet until the upper-body shaping begins.
At this point, the pattern combines armhole shaping with decreases along the neckline edge.
These decreases gradually create one side of the V-neck opening.
Once the required shoulder width remains, the panel continues to the appropriate height so it can align with the back.
3. Making the Left Front Panel
The left front follows the same general construction as the right front, with the shaping reversed.
This mirrored arrangement allows both front panels to meet evenly at the center opening.
Matching the lengths and shaping of the two panels is important for keeping the neckline symmetrical and ensuring the button band sits correctly.
4. Crocheting the Balloon Sleeves
The sleeves begin with fitted ribbed cuffs.
After completing the cuffs, stitches are worked along the ribbing edge to begin the main sleeve fabric.
Increases are distributed through the sleeve body to create the characteristic balloon shape.
Once the sleeve reaches its intended width, the pattern continues briefly without further increases.
The upper portion is then shaped into a sleeve cap using decreases. This allows the sleeve to fit into the cardigan’s armhole opening during assembly.
Both sleeves follow the same construction.
5. Joining the Cardigan Pieces
Assembly begins by joining the shoulder edges of the front and back panels.
The sleeves are then positioned in their armholes, aligning the sleeve caps with the shoulder seams.
After attaching the sleeves, the side and underarm seams are joined.
The original pattern uses slip stitch seams throughout assembly.
Careful alignment is important here. Evenly distributing the sleeve fabric around the armhole helps prevent unwanted bunching or distortion.
6. Adding the Button Band and Neckline Edging
The cardigan features a continuous ribbed edging that follows the right front opening, crosses the back neckline, and continues down the left front.
This edging gives the opening a structured finish and provides space for the button closure.
The original design includes four buttonholes on the right front band, with corresponding buttons sewn onto the left side.
The finished band frames the V-neck and complements the ribbing at the hem and cuffs.
7. Making the Three-Dimensional Blueberries
The blueberry decorations are worked separately using navy blue worsted-weight yarn and the smaller crochet hook.
Each berry is formed as a small crocheted sphere, lightly filled with polyester fiberfill and closed.
The green leaves are made separately using the smallest hook.
White embroidery floss is used to add a small star-shaped detail to the berries.
The completed decorations are grouped into clusters of two or three berries, accompanied by leaves.
Once the cardigan is finished, the clusters are arranged across the body and sleeves and sewn securely in place.
Because the decorations are attached individually, their placement can be adjusted before sewing.
Finishing and Blocking Your Cardigan
Finishing is an important stage of this crochet sweater project because it helps the separate pieces settle into a cohesive garment.
Begin by weaving in loose yarn ends and checking that the seams, buttons, and decorative clusters are secure.
The original designer recommends wet blocking the completed cardigan.
The suggested method involves soaking the garment in cool water, removing excess moisture gently with a towel, and laying it flat to dry.
Blocking can help even out the appearance of the stitches and allow the garment to settle into its intended shape.
Avoid stretching the ribbed cuffs, hem, or button band excessively while the cardigan dries.
Always check the yarn manufacturer’s care recommendations before washing or blocking.
Helpful Tips for a Neater Crochet Sweater
Check Your Gauge Before Making the Panels
A small gauge difference can affect the finished cardigan’s width and proportions.
Prepare and block a sample before starting the main garment so you can compare your stitches with the designer’s measurements.
Use Stitch Markers During Shaping
Stitch markers are particularly useful when working the V-neck and armholes.
They can help identify important stitch positions and make it easier to maintain consistency across the two front panels.
Marking the center of the back panel also provides a useful reference during assembly.
Check the Fit Before Attaching the Sleeves
The original designer recommends trying on the assembled body before completing the sleeve attachment.
This provides an opportunity to assess the overall fit and determine whether the cardigan sits as expected.
It is easier to identify potential fitting concerns before all the seams are completed.
Take Your Time With the Seams
Joining the panels carefully helps the cardigan maintain its shape.
Align corresponding edges before sewing and avoid pulling the joining yarn too tightly.
Working slowly around the sleeve caps is especially useful because those sections contain shaped edges.
Plan the Blueberry Placement Before Sewing
The blueberry clusters are a defining part of the design, so their arrangement deserves attention.
The reference cardigan features decorations distributed across the body and sleeves.
You can follow that placement or experiment with a different arrangement, such as concentrating the clusters toward the lower body or arranging them diagonally.
Positioning the clusters before sewing allows you to assess their overall balance.
Final Thoughts on the Blueberry Dream Cropped Cardigan
The Blueberry Dream Cropped Cardigan combines practical garment-making techniques with charming three-dimensional embellishments.
Its half double crochet fabric, ribbed edges, shaped V-neck, and balloon sleeves provide an opportunity to practice several intermediate crochet skills within one project.
The separately crocheted blueberries make the design distinctive while keeping the main garment construction free from intricate colorwork.
For crocheters who enjoy making wearable pieces with a playful finish, this pattern offers a combination of structure, texture, and decorative detail.
Conclusion
The Blueberry Dream Cropped Cardigan is a charming crochet sweater project that brings together cozy texture, stylish balloon sleeves, and playful handmade blueberry details. Its cropped silhouette, V-neck opening, and ribbed finishes create a versatile cardigan with a distinctive handmade appearance.
This intermediate-level project offers an opportunity to develop garment construction skills, from shaping individual panels to assembling sleeves and attaching decorative elements. The combination of simple crochet fabric and three-dimensional embellishments makes the finished cardigan especially appealing.
Whether you’re expanding your handmade wardrobe or exploring more detailed crochet clothing projects, this blueberry-inspired cardigan is a rewarding design to consider.
Frequently Asked Questions
Is the Blueberry Dream Crochet Sweater Suitable for Beginners?
The original pattern is classified as intermediate. It involves garment shaping, increases, decreases, seaming, and small amigurumi-style decorations. Crocheters who already understand basic stitches and have some experience following garment patterns will find it more approachable.
Can I Make This Crochet Sweater in Different Sizes?
Yes. The original pattern provides instructions for six sizes, ranging from XS to 2XL. Before choosing your size, compare your body measurements with the finished garment measurements and consider the recommended positive ease for a comfortable fit.
Are the Blueberry Decorations Crocheted Directly Onto the Cardigan?
No. The blueberries and leaves are crocheted separately and attached after the cardigan is assembled. The berries are lightly stuffed to create their three-dimensional shape, while embroidered details complete their appearance. You can arrange the clusters before sewing them securely into place.
How Should I Wash and Care for the Finished Crochet Cardigan?
The original designer recommends wet blocking the finished cardigan using cool water, gently removing excess moisture with a towel, and laying the garment flat to dry. For regular washing, follow the care instructions provided by your chosen yarn manufacturer. Avoid excessive stretching and handle the decorative blueberry clusters carefully.
Leave a Reply