
Crochet Panda: An Adorable and Easy Amigurumi Project
A Crochet Panda is a charming amigurumi project that combines soft yarn, simple crochet techniques, and playful animal details. With its oversized head, rounded ears, tiny paws, and classic black-and-white colors, this miniature panda makes a lovely handmade accessory or decorative keepsake.
This project is designed around small crocheted pieces that are joined together to create a complete panda. It offers beginners an opportunity to practice basic amigurumi techniques while giving more experienced crocheters room to experiment with decorative details.
Whether you want to make a keychain, decorate a bag, or create a thoughtful handmade gift, this little panda is a versatile project that can be personalized in several ways.
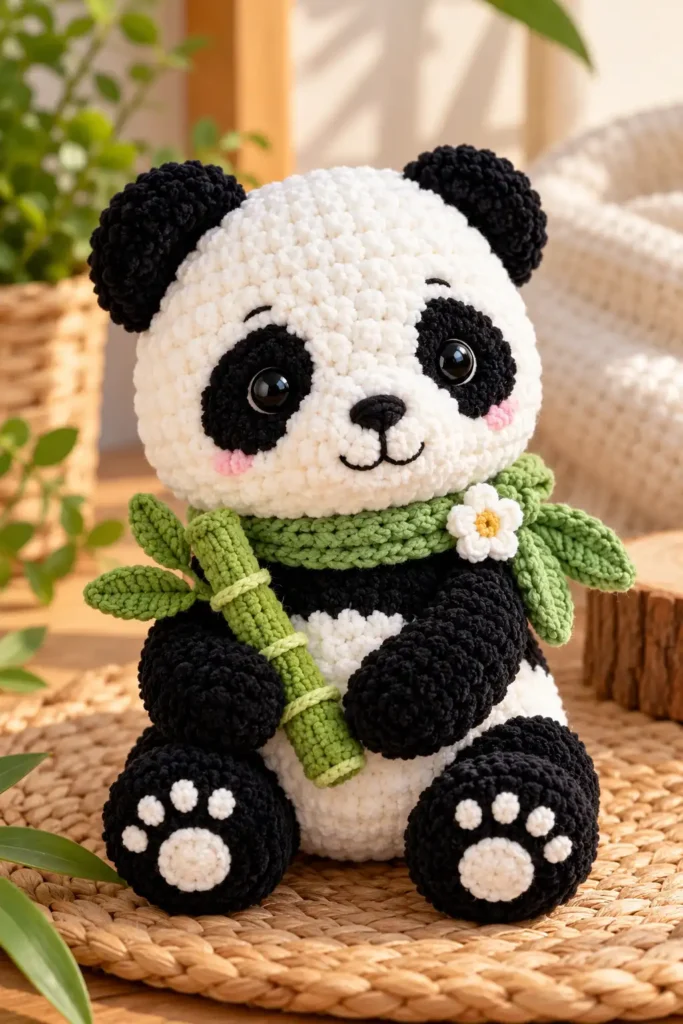
Table of Contents
Create a Cute Crochet Panda Amigurumi
The most recognizable feature of this panda design is its large, rounded head paired with a much smaller body. The contrast between these shapes creates a playful appearance without requiring complicated decorative stitches.
White yarn forms the main sections of the head and body, while black yarn is used for the ears, arms, legs, and part of the body. Black felt adds the characteristic patches around the eyes, helping the finished toy resemble a panda.
The project uses the magic circle technique to begin several of its rounded pieces. Crochet increases help shape the larger sections, while invisible decreases create smoother transitions as the pieces become narrower.
Although the design uses basic stitches, the small components require careful handling. Beginners who already understand single crochet and working in rounds may find this a useful project for developing their amigurumi skills.
Materials Needed for Your Panda
Gather the following supplies before beginning:
- 3.5 mm crochet hook: Used to create the crocheted components.
- Medium-weight yarn: White and black for the panda, with optional green for a decorative leaf.
- 6 mm safety eyes: For the panda’s facial features.
- Black craft felt: For the eye patches and nose.
- Stuffing: To fill the head and body.
- Stitch marker: To identify the beginning of each round.
- Threaded needle and black thread: For attaching pieces and adding details.
- Scissors: For cutting yarn and felt.
- Hot glue gun: Listed as an option for attaching decorative components.
- Key ring (optional): For turning the finished panda into an accessory.
The reference does not specify a finished measurement, gauge, or exact yarn quantity. These details should not be assumed when preparing materials.
For toys intended for young children, avoid glued-on parts, detachable decorations, and safety eyes. Embroidered facial details are a safer alternative, although the complete toy must still be checked for securely attached components.
Special Features of This Mini Panda
One of the appealing aspects of this amigurumi design is its flexibility. The basic panda can remain simple, or additional accessories can give it a different personality.
A small green leaf can be attached to one paw, while a bow or miniature scarf can change the overall appearance. A hanging loop can transform the panda into an ornament, and an optional key ring makes it suitable for attaching to a bag or keys.
The design also provides practice with two useful amigurumi techniques: the magic circle and invisible decreases. Both help create neatly shaped pieces, especially when working with rounded forms.
Understanding the Crochet Panda Construction
The panda is made from several small crocheted components that are assembled after the individual sections have been completed.
The original instructions use US crochet terminology, including single crochet (SC) and half-double crochet (HDC).
The main abbreviations and techniques include:
| Term | Meaning |
|---|---|
| SC | Single crochet |
| HDC | Half-double crochet |
| CH | Chain |
| Slip stitch | A stitch used for joining or finishing |
| Increase | Working additional stitches to expand a section |
| Invisible decrease | Reducing stitches with a less noticeable finish |
| Magic circle | An adjustable starting ring for crocheting in rounds |
1. Shaping the Rounded White Head
The head is the largest and most noticeable part of the panda.
It begins with white yarn worked into a magic circle. Gradual increases expand the fabric into a rounded shape, followed by rounds that maintain its width.
Invisible decreases then narrow the lower portion of the head, creating the characteristic amigurumi silhouette.
Stuffing is added before the head is finished. Distributing the filling evenly helps maintain a rounded appearance and prevents noticeable empty areas.
A yarn tail is left for attaching the head to the body during assembly.
2. Crocheting the Black-and-White Body
The body uses both black and white yarn to create the panda’s familiar color arrangement.
The reference begins this section in black before changing to white. The body is worked in rounds, with decreases used toward the end to narrow its shape.
The result is a compact body that supports the larger head without overwhelming the miniature design.
Stuffing is inserted before the body is completely closed. Keeping the filling evenly distributed helps the panda retain its intended proportions.
3. Making Two Small Black Ears
The ears are separate crocheted pieces made with black yarn.
Each ear begins with a magic circle and is shaped into a small, slightly curved form. Their compact size complements the panda’s oversized head.
Once completed, the ears are positioned on opposite sides of the upper head.
Careful placement matters because the angle and spacing of the ears influence the finished expression. Checking their positions before securing them helps keep the face balanced.
4. Creating the Tiny Arms
The panda has two short arms crocheted with black yarn.
These are small rounded components that require relatively few stitches compared with the head and body.
Because of their size, the stitches may be more difficult to see and handle. A stitch marker and consistent tension can make the process easier.
The arms are attached to the sides of the body during assembly. They can also provide a place to attach a small decorative accessory, such as the optional leaf.
5. Forming the Little Black Legs
The legs follow the same general approach as the arms, using black yarn and small circular shapes.
Both pieces are made separately and attached near the lower part of the body.
Positioning the legs symmetrically helps maintain the panda’s proportions. Before sewing, place both pieces against the body and compare their alignment.
These miniature details contribute to the toy’s compact appearance and complete its recognizable animal shape.
6. Adding an Optional Green Leaf
The reference includes a small green leaf as an optional decorative feature.
Unlike the rounded body components, the leaf uses a short foundation chain and a combination of stitches, including half-double crochet and single crochet.
This produces a small embellishment that can be attached near one of the panda’s hands.
The leaf is not necessary for the basic panda design, but it provides a simple opportunity to introduce another color and personalize the finished project.
Assembling Your Crochet Panda
Once the crocheted pieces are complete, the next stage is bringing the panda together.
Preparing the Face
The facial details are especially important because they give the panda its recognizable expression.
The reference uses black felt cut into elongated patches for the eye areas, along with a smaller rounded piece for the nose.
The 6 mm safety eyes are positioned in the eye patches and secured with their backings.
When using safety eyes, they should be installed before the head is completely closed, while the inside remains accessible. Their backings need to be properly secured through the crocheted fabric, not merely attached to the felt with glue.
Attaching the Ears, Arms, and Legs
Arrange the ears on the upper sides of the head, checking that both pieces sit at similar heights.
Next, position the arms along the body and the legs toward its lower section.
The reference allows sewing or gluing for certain attachments. Sewing the crocheted pieces securely is generally preferable when durability matters.
Use the yarn tails left during crocheting to attach the pieces where appropriate. Check the positioning from the front and sides before finishing the seams.
Completing the Final Details
After the main components have been joined, attach the remaining facial features and any optional decorations.
The green leaf can be placed beside one hand. A hanging loop or key ring can also be added if the panda will be used as an accessory.
Before considering the project complete, inspect the attachments, weave in loose yarn ends, and gently shape the stuffed sections.
Helpful Tips for a Neater Panda
Small amigurumi projects can be surprisingly detailed, particularly when working with dark yarn and tightly formed stitches.
The original tutorial emphasizes patience, controlled tension, and careful handling of the miniature pieces.
Keep Your Stitches Consistent
Amigurumi usually benefits from firm stitches because they help contain the stuffing and maintain the shape of each piece.
However, excessively tight tension can make inserting the hook difficult, especially in the ears, arms, and legs.
Aim for stitches that are close enough to limit visible gaps while remaining comfortable to work.
Make Dark Stitches Easier to See
Black yarn can make individual stitches harder to identify.
Working under a bright light helps reveal the stitch structure. A contrasting crochet hook can also make the loops more visible.
Take extra care when counting stitches around the small circular pieces, where a missed stitch can change the finished shape.
Take Your Time With Small Components
The ears and limbs require precision because they contain fewer stitches and leave less room for adjustment.
Working slowly, using a stitch marker, and checking each piece before fastening off can help prevent uneven shapes.
When assembling the panda, temporary placement of the pieces before sewing is also useful for achieving a balanced result.
Creative Ways to Use Your Finished Panda
The small size and decorative design make this panda suitable for several handmade accessories.
Panda Keychain or Bag Charm
Adding a key ring transforms the crocheted panda into a personalized accessory.
It can be attached to a backpack, handbag, or set of keys, provided the finished attachment is secure enough for the intended use.
The black-and-white design is easy to recognize, while an optional leaf or bow adds an individual touch.
Hanging Decoration
A securely attached hanging loop allows the panda to be displayed as a decorative ornament.
It can be used as a room decoration or a hanging accessory. If displayed in a vehicle, keep it away from the driver’s view, controls, and airbag areas.
Personalized Handmade Gift
A miniature panda can also make a thoughtful gift for someone who enjoys animals, crochet, or small handmade collectibles.
Personalization can be as simple as changing the decorative accessory or adding a small scarf.
The project is particularly suitable for crocheters who enjoy creating individual amigurumi characters from separate pieces.
Finishing Your Panda With Care
A completed Crochet Panda brings together several useful crochet skills in one compact project. From shaping the oversized head to attaching the tiny ears and paws, each component contributes to the finished character.
The design offers a manageable way to practice working in rounds, changing yarn colors, making invisible decreases, and assembling stuffed crochet pieces.
With careful stitching and thoughtful finishing, the result is a small handmade panda that can become a decorative keepsake, a bag charm, or a personalized gift.
Conclusion
Creating a Crochet Panda is a delightful way to explore amigurumi while making something cute, practical, and personal. From its rounded white head and tiny black ears to its expressive face and miniature paws, every detail contributes to the panda’s adorable appearance.
This project allows crocheters to strengthen their skills in working in rounds, shaping small pieces, changing yarn colors, and assembling amigurumi components. With patience and careful finishing, the individual pieces come together to form a charming handmade character.
Frequently Asked Questions About Crochet Panda
1. Is the Crochet Panda pattern suitable for beginners?
Yes, this project can be suitable for beginners who already understand basic crochet techniques. It involves working in rounds, making single crochet stitches, using increases and invisible decreases, and joining separate pieces.
The smaller components may require additional patience, but they provide useful practice for improving stitch consistency and amigurumi assembly skills.
2. What type of yarn is used to make this crochet panda?
The reference pattern lists medium-weight yarn in black and white for the main panda, with optional green yarn for a decorative leaf.
Using consistent yarn thickness throughout the project helps the separate components maintain balanced proportions. The reference also specifies a 3.5 mm crochet hook.
3. Can I turn my crochet panda into a keychain?
Yes! The panda can be adapted into a keychain or bag charm by attaching a suitable key ring or hanging loop.
Make sure the attachment is securely fastened to the crocheted body. Check that the ears, limbs, and decorative features are firmly attached, particularly if the panda will be carried regularly.
4. How can I personalize my finished crochet panda?
You can personalize your panda with small decorative accessories such as a green leaf, a miniature bow, or a scarf.
You can also choose whether to display it as a decorative ornament or attach it to a bag. Keep additional accessories lightweight and securely attached so they do not distort the panda’s shape.
Leave a Reply