Crochet Winter Snowflake Coasters: A Beautiful Handmade Project
Snowflakes are one of the prettiest inspirations for crochet winter projects. Their delicate shapes, symmetrical details, and seasonal charm make them especially appealing for handmade home accessories. If you’re looking for a small project that combines decorative stitching with everyday usefulness, a crochet snowflake coaster is a lovely choice.
These snowflake-shaped coasters bring a winter-inspired accent to coffee tables, dining spaces, and holiday gatherings. Their textured centers and pointed edges create an intricate appearance without requiring a large or complicated project.
Inspired by the snowflake coaster design shared by Kimberly Arenas at The Caffeinated Snail, this project is suitable for adventurous beginners and experienced crocheters. It uses familiar crochet stitches, a circular construction, and decorative chain loops to create a recognizable snowflake shape.
Whether you’re preparing seasonal decorations, making handmade gifts, or simply enjoying a relaxing afternoon with yarn, these coasters offer a practical way to celebrate winter through crochet.
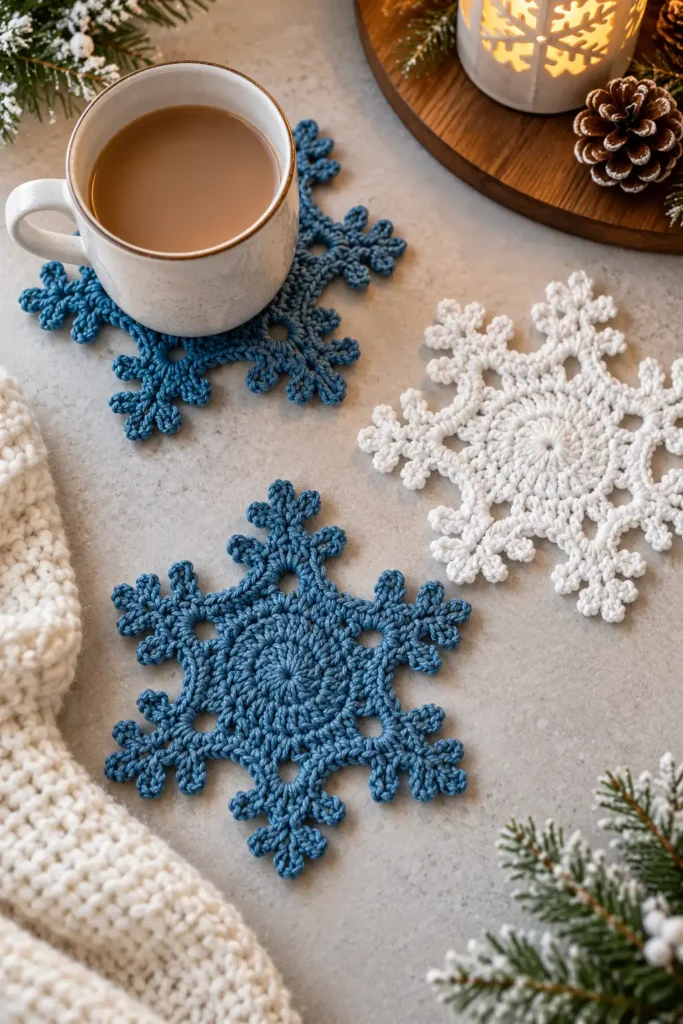
Table of Contents
What to Know Before Starting Your Snowflake Coasters
A successful snowflake coaster depends on more than the decorative stitches. Yarn selection, hook size, stitch tension, and finishing techniques all influence the appearance of the finished piece.
Choose Cotton Yarn for Practical Results
Cotton yarn is particularly suitable for crocheted coasters because it absorbs moisture and holds its shape well.
Unlike projects designed primarily for warmth, coasters need a relatively stable surface that can sit beneath cups and glasses.
Cotton also makes everyday maintenance easier, especially when the coasters are used regularly.
Pay Attention to Your Crochet Hook
The original design uses a 4.5 mm crochet hook.
Hook size influences the density and flexibility of the finished fabric. A hook that is too small for your yarn and tension may produce stiff stitches, while a larger hook can create a looser structure.
For this project, the goal is to maintain a comfortable tension while keeping the snowflake’s central section reasonably flat.
Maintain Consistent Stitch Tension
Even tension is especially important when crocheting circular motifs.
If some stitches are noticeably tighter than others, the coaster may develop uneven edges or fail to lie flat.
Try to keep your chains and taller stitches consistent throughout the project. This becomes particularly important when working the decorative points around the snowflake.
Give Your Finished Coaster a Neat Shape
Blocking can help emphasize the snowflake’s decorative outline.
After completing the crochet work, gently arrange the points into their intended positions and allow the coaster to dry flat using a blocking method appropriate for the yarn.
This finishing step can make the individual snowflake points more visible and improve the overall presentation.
Materials for Your crochet winter Snowflake Project
The original snowflake coaster design uses a short list of supplies.
- Lily Sugar’n Cream cotton yarn in Blue Jean
- Lily Sugar’n Cream cotton yarn in White
- 4.5 mm crochet hook
- Tapestry needle for weaving in yarn ends
The two suggested yarn colors create a classic winter palette. White resembles freshly fallen snow, while the muted blue introduces a gentle contrast.
The original article does not specify an exact yarn quantity, finished diameter, or numerical gauge, so those details should not be assumed.
Crochet Stitch Abbreviations and Terminology
The original pattern uses US crochet terminology.
Understanding the abbreviations before beginning will make the construction easier to follow.
| Abbreviation | Meaning |
|---|---|
| mr | Magic ring |
| ch | Chain |
| sc | Single crochet |
| hdc | Half double crochet |
| dc | Double crochet |
| sl st | Slip stitch |
| inc | Increase |
The project combines basic stitches with decorative chain spaces to build its snowflake silhouette.
Crocheters who already know how to work a magic ring, join rounds, and make the listed stitches will have a useful foundation for following the design.
Creative Variations for Your Snowflake Coasters
Although white and blue create a traditional winter appearance, the same general design can be adapted to different decorating styles.
Experiment With Seasonal Colors
A collection of white snowflakes can create a clean, understated look.
For a softer arrangement, consider pale blue, cream, or pastel shades. More vibrant colors can make the coasters stand out against neutral table settings.
You can also make several coasters in coordinating colors to create a matching set for holiday entertaining.
Explore Different Sizes
The original article suggests experimenting with yarn weight and hook size to produce larger or smaller snowflakes.
A larger version may work as a decorative table accent, while a smaller version can be used beneath cups or glasses, provided its finished dimensions are suitable.
Changing the yarn or hook may also affect the coaster’s texture, drape, and ability to lie flat.
Because the reference does not provide tested measurements for these variations, the finished size will depend on your materials and individual tension.
Understanding the Snowflake Coaster Construction
The snowflake coaster is worked in joined rounds, beginning at the center and progressing outward.
Rather than constructing separate pieces and sewing them together, the design develops its shape through a sequence of circular stitches and decorative extensions.
Building the Circular Center
The project begins with a magic ring, which provides a compact starting point.
Double crochet stitches form the initial circular section. The following round increases the stitch count, expanding the center into a wider, flatter shape.
This circular foundation supports the decorative snowflake points added later.
Creating Spaces for the Snowflake Details
Once the center is established, the design introduces a combination of single crochet, half double crochet, double crochet, and chain stitches.
These stitches create spaces around the outer portion of the coaster.
The spaces serve as attachment points for the snowflake’s decorative extensions and help establish the repeated structure of the design.
Forming the Snowflake Points
The outer round gives the coaster its distinctive winter appearance.
Chains, slip stitches, and taller crochet stitches are combined to form projecting points with smaller decorative loops.
These details transform the circular foundation into a snowflake-inspired shape.
The final round requires careful attention because the decorative elements contain several stitch changes.
Finishing the Coaster
After completing the decorative round, the yarn is fastened off and the remaining ends are woven securely into the fabric.
A tapestry needle helps conceal the ends without leaving loose strands around the snowflake.
If the points appear uneven, blocking may help define their shape and give the finished coaster a flatter appearance.
Helpful Tips for Better Crochet Snowflake Coasters
A few finishing and customization ideas can make your handmade coasters more useful and attractive.
Consider a Non-Slip Backing
The original article suggests attaching non-slip material or felt to the underside of the coaster.
This can help reduce movement on smooth tabletops.
If you choose to add a backing, make sure it does not interfere with the coaster’s ability to handle moisture or sit evenly beneath a cup.
Personalize Your Designs
Different colors can make each coaster feel unique.
You can also experiment with small embroidered details or decorative appliqués, as suggested in the original article.
Keep embellishments away from the area where a cup needs to rest, so the coaster remains functional.
Improve With Each Coaster
Repeated motifs provide an opportunity to practice consistent tension and stitch placement.
Your first snowflake may have slightly uneven points, especially if you’re still getting comfortable with chain spaces and decorative loops.
As you become more familiar with the construction, it may become easier to maintain a consistent shape.
Create Coordinated Handmade Gift Sets
Snowflake coasters can be grouped into sets for winter celebrations.
Pairing a coordinated collection with a mug creates a thoughtful handmade gift.
You can choose colors that complement the recipient’s home or use traditional winter shades for a seasonal presentation.
Frequently Asked Questions About Crochet Snowflake Coasters
How Long Does It Take to Crochet a Snowflake Coaster?
According to the original article, most coasters can be completed in under an hour.
The actual time will depend on your experience, stitch familiarity, and working pace.
Beginners may need additional time to understand the decorative outer round.
Can Crochet Snowflake Coasters Be Washed?
Cotton crochet coasters can generally be washed on a gentle machine cycle, provided the yarn’s care label allows it.
The original article recommends laying the coasters flat to dry to help preserve their shape.
Avoid stretching the decorative points excessively when handling a wet coaster.
What Yarn Is Best for Crochet Snowflake Coasters?
The original designer recommends 100% cotton yarn.
Cotton offers absorbency, durability, and convenient cleaning, making it a practical option for an accessory that may regularly come into contact with drinks.
How Can I Prevent My Snowflake Coaster From Curling?
Consistent stitch tension is one of the most important considerations.
If the stitches are too tight or uneven, the circular fabric may curl or distort.
Blocking the completed coaster can also help it lie flatter and give the decorative points a more defined appearance.
More crochet winter Projects to Explore
If you enjoy creating snowflake coasters, the original website also features other seasonal crochet ideas.
Crochet Checkered Beanie
A checkered beanie offers a different type of winter project, combining a wearable accessory with a distinctive geometric appearance.
Crochet Green Scarf
A crocheted scarf is another option for anyone who enjoys making handmade accessories for colder weather.
Crochet Peppermint Coasters
Peppermint-inspired coasters provide an alternative seasonal table decoration, especially for Christmas-themed settings.
Crochet Linen Stitch Scarf
A linen stitch scarf introduces another stitch texture to explore while making a practical winter accessory.
Snowflake coasters are a small but appealing way to bring seasonal character into your home. With cotton yarn, familiar crochet stitches, and carefully shaped decorative points, they combine useful everyday design with the delicate appearance of winter snowflakes.
Whether you make one for your favorite mug or a coordinated set for holiday gatherings, this project offers an enjoyable opportunity to practice circular crochet and create something handmade for the winter season.
Leave a Reply